入门写的一些笔记,此文绝对会有很多问题(希望大佬指出 :V
关于编译内核
下载kernel源代码:https://www.kernel.org/
随意选个版本,比如4.15.0
https://mirrors.edge.kernel.org/pub/linux/kernel/v4.x/linux-4.15.tar.gz
安装些必要的依赖
1 | sudo apt-get update |
解压源码后进目录
1 | make menuconfig |
基本不需要改什么,直接save。
sakura的说法是
1 | 进入kernel hacking |
不过貌似这些默认都是已选的。
1 | make bzImage |
玩几局游戏以后能看到如下信息就是编译OK了。
1 | Setup is 17244 bytes (padded to 17408 bytes). |
从./arch/x86/boot/拿到bzImage,从源码根目录拿到vmlinux。
关于添加syscall
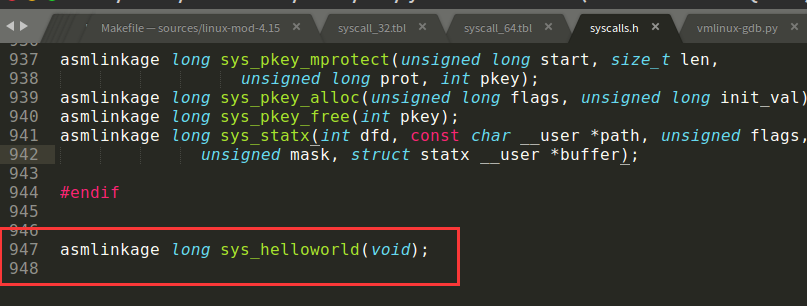
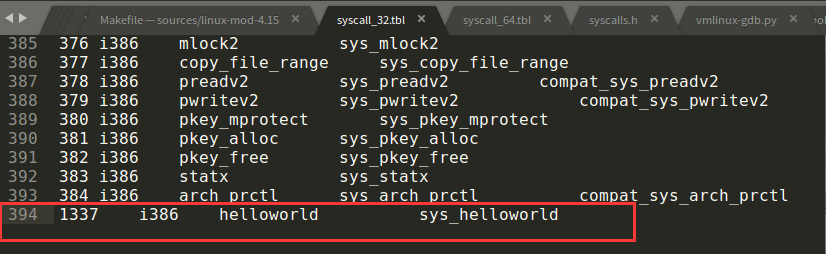
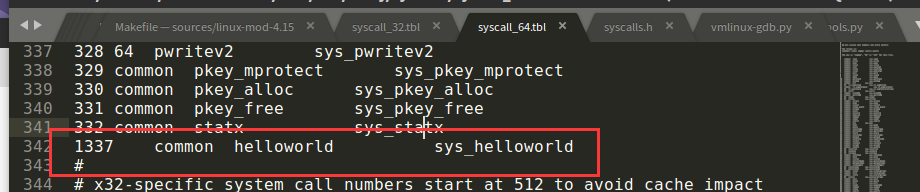
添加一个helloworld的syscall做示例。
以4.15.0版本的kernel为例子。
源码根目录创建helloworld目录
1 | # veritas @ ubuntu in ~/sources/linux-mod-4.15/helloworld [13:56:08] |
编辑源码根目录下的Makefile,添加helloworld/

编辑include/linux/syscalls.h,添加函数原型
编辑arch/x86/entry/syscalls/syscall_32.tbl和arch/x86/entry/syscalls/syscall_64.tbl,添加系统调用号
然后编译kernel。
1 | make bzImage |
从./arch/x86/boot/拿到bzImage。
编译busybox
上官网下载源代码编译https://busybox.net/
以1.28.4为例。http://busybox.net/downloads/busybox-1.28.4.tar.bz2
解压后到根目录
1 | make menuconfig |
进Settings,勾上Build static binary (no shared libs)
make install -j4
编译完成后跟目录多了一个_install的目录,就是我们编译的结果了。
1 | cd _install |
其中init中添加如下内容
1 | #!/bin/sh |
可以写这样一个脚本来打包rootfs。
1 | #!/bin/sh |
##启动qemu
通过上面两步,我们得到了含有helloworld syscall的kernel bzImage和用busybox打包的fs。
接下来只要用qemu启动就ok了。
在这之前,可以先写一个测试程序来测试我们写的syscall。
1 | //gcc test.c -static -o test |
放在fs目录下,重新打包得到新的rootfs.img。
可以写一个脚本来启动qemu。
1 | #!/bin/sh |
运行结果
1 | / $ ls |
##加载ko
ko的载入很简单,只需要
1 | $ insmod xxx.ko |
但ko需要指定的kernel版本才能正常载入。
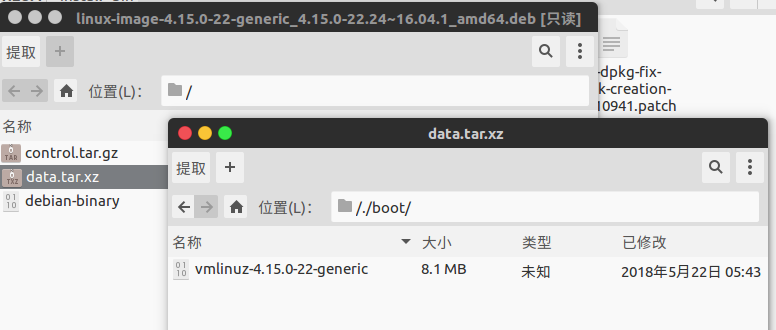
例如0CTF final的baby kernel,他要求的kernel版本为4.15.0-22-generic SMP mod_unload
可以使用apt download 相应内核的deb包,然后解包得到bzImage。
1 | $ apt download linux-image-4.15.0-22-generic |
修改fs的init脚本,加入insmod xxxx.ko即可。
载入系统后可以使用lsmod来查看载入的ko以及他的所在的内核地址
##调试ko
一般来说加nokaslr把kaslr关了调试起来会方便一些。
把启动脚本的最后两行注释取消,则qemu在启动后会等待调试器的连接。
写这样一个脚本来快速连接
1 | #!/bin/sh |
Reference
- http://pzhxbz.cn/?p=97
- http://pzhxbz.cn/?p=98
- http://pzhxbz.cn/?p=99
- https://www.anquanke.com/post/id/85837
- https://www.anquanke.com/post/id/85840
- https://www.anquanke.com/post/id/85848
- http://www.freebuf.com/articles/system/94198.html
- http://www.freebuf.com/articles/system/135402.html
- https://blog.csdn.net/lUNATICF/article/details/55098274
- https://medium.freecodecamp.org/building-and-installing-the-latest-linux-kernel-from-source-6d8df5345980
- http://eternalsakura13.com/2018/04/13/qemu/
- https://medium.com/@ssreehari/implementing-a-system-call-in-linux-kernel-4-7-1-6f98250a8c38